place various pdfs (or other common graphic formats files such as jpg, tif, gif, eps, psd, image in the pasteBoard) on a virtual plotter sheet;
arrange all objects in a WYSIWYG environment moving, rotating and scaling them;
print the so arranged plotter sheet and eventually save it for later printings.
1+2+3 = Saving paper and time.
The first idea of FitPlot comes out of a demand, in my daily work, to print wide format documents (typically A0, A1, A2 produced by a CAD program) on a 42" plotter. I always had a remnant of the aside unused paper, and even if I used cheap material, nevertheless it was a waste. Furthermore I often had to print more copies of the same drawing and, printing from the CAD program, I obtained my copies disposed in a single column on the plotter output, while they could have been placed, for example, more than just one in a row.
Summoning all this I start to develop FitPlot that has become un-replaceable in this first task and, as I am surprisingly discovering, in many other uses I'll try to explain in the scenarios section below.
I know this could be done with blazoned vectorial applications, but, these are oversized for this simple task and tough they may do it better (surely they do!), they are not focused on this, therefore, FitPlot has already finished the job while they are still loading, asking all they need to start a new document etc..
FitPlot may take place between the document/s (pdf, jpeg, tiff or other) and the output device. It has not to be an obstacle to your workflow. Keeping this in mind, all possibilities has been explored to develop a program that speed up the layout work (assembling images in the plotter sheet); the use of a customizable toolbar, with all the preferred commands at hand. All editing such moving, rotating, resizing can be made both manually and numerically. And more, specialized tasks such packing, serial duplication and even booklet imposition are all there at your disposal to make FitPlot a versatile printer companion, customizable to your needs and with its own peculiarities that other programs do not offer.
Scenarios
I encourage you to send by mail to your own scenario in using FitPlot. Situations that may be useful for other users will be published here.
Thank you for your cooperation. Paolo.
1. Print CAD drawings (PDF's) on a plotter
Launch FitPlot.
Drag all your PDFs files on the FitPlot main window.
In the showing dialog click on the "shrink / expand" option, both in vertical and in horizontal. This makes the current page size to adjust at the minimal size containing all your objects (you should have set the page size ranges in the margins setup dialog see details in packing section and margins setup section). Click confirm.
If the result is good, print, else undo and start again.
2. Print more copies of the same document / image
Launch FitPlot.
Set the desired page size (see set page size).
Insert the image to print in more copies.
Place with the top-left corner near the origin of the printable area.
In the showing dialog fill the fields requesting the number of copies in horizontal and in vertical. Below there are two fields to set spacing between copies. They are preset, for convenience, with the width/height value of the object to replicate, to obtain contiguos copies. More below, there is a checkbox that, in case of multipage PDFs, increase the page number at each copy, with the numbering flowing from left to right and from top to bottom. Click confirm.
If the result is good, print, else undo and start again.
3. Printing images dropped while surfing the net
Launch FitPlot and the web browser.
Set the desired page size (see set page size).
With the browser window on top, leave a screen portion to let FitPlot work area visible. When you find an image you want to print, drag and drop it from the web browser to FitPlot. When you are finished with the browser (or images are enough along with the chosen page size), pass to FitPlot to adjust the layout (move, resize etc.).
If the result is good, print.
NOTE: FitPlot does not save images data along with its documents. It saves only the "path" to images. This implies that if an images is coming from a drag&drop from the web, it has not a corresponding file on the disk. So, when saving a document with an image with undefined path, FitPlot will be unable to localize it when reopening the document and shows in place a broken chain image. However, in the program preferences, you can set how to behave in such circumstances. In brief, you can let the program save the so called pasteboard images in a folder you choose, with a naming convention (prefix and progressive numbering) in .tif format. The second chance is to do nothing to preserve them, useful for disposable printing. Anyway, the program comes with a default preference that ask how to behave the first time you encounter this situation. Further informations here.
4. PDFs transparent merging
It happens sometime, in my work, to send by e-mail text documents paged in the official company headed paper.
A fundamental ingredient for this procedure is the company headed paper in PDF. If you do not have it, ask to your typography or your graphic designer.
Prepare your document with your text editor as you usually do, to have it printed on your real headed paper.
Instead of print it, save it as PDF (all Mac programs can do this, directly or via the printing dialog).
Launch FitPlot.
Choose the page size according to your headed paper.
Insert the company headed paper PDF and set its top-left corner to (0,0).
Insert the letter you prepared and do the same as above.
Apply the style "PDF transparency" to the letter, the underlying company headed paper it is now visible.
From the menu File select the item "Export as PDF".
Attach the just exported document to the e-mail and send it.
NOTE: in case your letter is more than one page, do the same until the point 7, then select all (cmd-A) and use the serial duplication tool (from the tool menu or in the toolbar). In the dialog showing up fill the fields as follows:
put 1 in the #horizontal field
put the number of pages of your letter in the #vertical field
put zero in the horizontal distance in the horizontal distance field
put the value of the vertical page size in the vertical distance field
check the increase PDF pages checkbox
click OK / confirm.
From the file menu or in the toolbar, use the pagination tool. In the dialog showing up:
put 1 in the horizontal pages field
put the number of pages of your letter in the vertical pages field
leave 0 in both overlap fields (overlap is no needed here!)
click OK / confirm.
now your pages should be ready to be printed / exported / viewed. Check them opening the pages drawer (click on the icon
at the top right of the main window, just above the max zoom control.
Now continue from the point 8.
5. Huge CAD drawings print
Here's another "peculiar" use of FitPlot that comes directly from my daily work experience that may be what you have searched in vane.
In my daily work I am requested to supply our joiner's workshop with 1:1 scale drawings. We made shop furnishing and they take full advantage of this prints in speeding up their work. From my side, it has been always a difficult work, paginating a drawing of a full 1:1 room in a 42" plotter roll, since FitPlot! Here's how you should do with a 6x6 mt. print:
In your CAD program set the scale to 1:10 (or the max scale you can according with the max available page sizes), so the whole 6x6 fits a 60x60 cm page size.
Print / export the drawing as PDF.
Launch FitPlot.
Insert the just created PDF.
Regain the 1:1 scale resizing the PDF to 1000% (remember, you set 1:10 at point 1). NOTE: As side-effect, you will have lines ten times thicker, so, if it is important, scale line thickness of a 10 factor in your cad drawings before exporting to PDF.
Set the top-left corner of the PDF to the top-left sheet margins.
Resize the page to the max wideness (for example 36" / 91 cm) for a length of 6 meters.
From the file menu or in the toolbar, use the pagination tool. In the dialog showing up:
put 7 in the horizontal pages field (600/91 = 6.6)
put 1 in the vertical pages field (6 meters per page = 1 vertical page)
put at least 5 cm in the horizontal overlap field and 0 in the vertical (this is essential to recompose the jig saw).
click OK / confirm.
now your pages should be ready to be printed. Check them opening te pages drawer (click on the small arrow at the top right of the main window, just above the max zoom control.
If the result is good and there is no part of the image left out, print, else try to change overlap according to the number of horizontal pages.
6. How to print a poster with a desktop printer
How to print a big size poster with a common A4/Letter desktop printer at our disposal?
Granted that an image, if not purely vectorial, is subject to loose resolution according to the magnification (so it's better do it from a good resolution original!), we can obtain a maxiposter from a desktop printer as follows:
Launch FitPlot.
Insert the image to enlarge.
Resize it in the desired final dimensions (use the width / height fields in the info panel to impose the wanted dimension).
From the file menu or in the toolbar, use the pagination tool. In the dialog showing up:
type the needed number of horizontal pages (total width / printer page width)
type the needed number of vertical pages (total height / printer page height)
if your printer has the "print without border" option, leave the overlap fields to 0, else, if you have the time and patience to trim all pages because you don't like the white borders, set the overlap values with the printer margins values (horizontal and vertical). This last thing may change the number of pages needed to obtain the whole image.
Optionally you can print registration marks for an easier rejoining.
click OK / confirm.
now your pages should be ready to be printed. Check them opening te pages drawer (click on the small arrow at the top right of the main window, just above the max zoom control.
7. Preparing a booklet
How often we incur in PDF manuals / tutorial / books out here on the web! Usually we print them to have a more comfortable reading. Quick print implies the use of one paper sheet per page (leaving the back blank). Some of you may print the odd pages before, then the even on the corresponding blank side of the just printed sheets. Using FitPlot you can prepare the disposition of the pages in a way typographies do to print book. On a desktop printer this may result in a 4 pages per paper sheet, 8 in an A3 printer.
All you have to do is to import the PDF in FitPlot and apply the "imposition" command, then you'll have your pages disposed in "recto" e "verso" to be printed alternatively using the "print only odd pages / print only even pages" option available on the print dialog.
The imposition command has its own subject in this help file, so go there for detailed instructions.
8. Preparing an images preview printing
Here's explained an easy way to layout automatically a folder of images for a quick print preview.
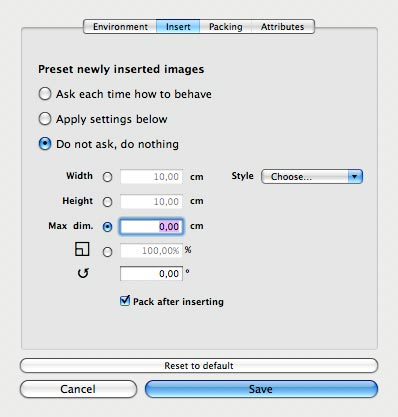
Using the new insert options available in the preference panel (see figure below) it is possible to make some operation on the newly inserted images in a way to show them resized and tidily laid out, optionally showing each one its file name tag.
Click on apply settings below option.
Click on Width (or Height) constrain field button.
Type the constrain Width (or Height) field value, this will cause all imported images to be resized to this width (or height) value.
Choose the File name tag style option (and any other style you desire to be applied, shadow, line, trims etc.).
Click on the Pack after inserting check box button (see packing preferences).
Insert your images by dropping them or by using the insert images tool . You can drop or insert more than one image at a time. In the browse files dialog (when inserting from menu or the command tool), choose / select all images you want to add clicking on them while holding the shift-key (if they are consequent in the list) or while holding the command-key if they are not consequent. Click the open button when you are finished et voilà.
9. Tracking your print work
From the 2.7 version of FitPlot you can easily track your print work. A couple of log files are created and updated each print you perform via FitPlot. You can import these files in a database or in a spreadsheet where you can extract statistics, billings, invoices etc.
Look here for further explanations.
* The toolbar is customizable, so it may be that in the default configuration this tool is not visible. Click on the customize toolbar icon, at the extreme right of the toolbar, to set your preferred tools. Anyway, for each tool there is menu doing the same task. [back]
What's new
Changelog
FitPlot 3.5.1
2011-04-11
Bug fixed. No more crash when reopening FitPlot documents containing multipage PDFs.
FitPlot 3.5
2011-01-31
Since this version the minimum version is MacOSX 10.5. This is due to new features and underhood changes.
Adjust image panel
As promised in the 3.2 version, the adoption of the core image technology brings new possibilities in image retouching directly from inside FitPlot.
Adjusting comprehends color spaces, brightenss, contrast, saturation, exposure and tinte (just to start…).
These functions are exclusively for raster images (jpg, tif, png…) and not for vectorials (pdf, eps, ps).
Note: Image retouching is applied inside FitPlot. The source image (inserted in the FitPlot document) is not affected by the adjusting at all.
Attributes Copy and Paste (edit menu and contextual menu)
Now you can copy and paste attributes from an image to another in the FitPlot document. You can copy size (area), angle, shadow, line, dash, label and all image adjust settings. Attributes to copy / paste are determined by the new attributes preferences tab. Note: In the image adjust panel there is a special push button to copy and paste only the color spaces, brightenss, contrast, saturation, exposure and tinte values.
Quick templates menu
If you have organized your FitPlot templates in the templates folder then you should be able to see all your files divided by folder (printer) and file name, as in the snapshot below.
If you haven't organized your templates yet, here's some suggestion:
Start FitPlot, choose new document from the file menu.
Go to the page setup menu, select printer, dimensions ant orientation, then click Ok.
Now you have a FitPlot document of the given size (for the given printer). You can complete the template setting printer margins (Tool menu) essential for correct automatic resizing in packing algorithm, and finally placing images, logos etc. you want to be present when opening from this template.
Now choose Menu->Save as Template…, you will be bringed directly in the Templates folder.
Click on the New Folder button if you need a new printer folder.
Finally give the document a self-explaining name (such as A4, A3, 32"x42" etc.).
Do the same for other printers / sizes and you'll have the File -> New From Model… menu populated with your items (needs to restart FitPlot!).
Pasteboard images (images inserted in FitPlot via Copy and Paste from other application via Drag and Drop from a web browser)
The pasteboard images policy (used in earlier versions) has been changed in order to apply them the new image adjust functionality (it was not possible on images not resident on the local disk).
The old pasteboard behavior panel in the preferences has disappeared. Now it will works this way: when you paste or drop an image from another program or web browser, the image is inserted in the FitPlot document and, at the same time, it is saved on the disk (as temporary file). Saving the FitPlot document, you'll be requested to store all the used temporary images in a folder that is up to you to choose and with a name composed by a prefix (you decide it, too) and an automatic progressive numbering.
If you can decide to discard the document, doing so, while quitting FitPlot all unused temporary images will be erased.
As a side effect of this (r)evolution, when pasting objects copied from a vectorial program (such as Pages® or Illustrator®), the resulting image will mantain its vectoriality (the temporary file will be, in effect, a PDF), with all the advantages of a vectorial image (enlarging without loss of quality).
Low Res image (for editing). Added a control in the preferences (environment) to set the image's resolution to be used during editing and while in low resolution mode.
In the window toolbar there is a low / high resolution button to render images to screen in low or high quality. Printing is not affected by this control, of course.
In high resolution mode it is always used the best resolution available for the image.
Low quality mode (for editing) is set by this slider between 0.1 (rough) and 1 (fine).
Images in low resolution are useful to speed up video refreshing while editing. Even in high resolution mode, while editing (move or crop), the low resolution image is used.
Minor changes
Improved batch image replacing: while replacing one or more images, the new one will retain (where possible) all the attributes of the replaced one.
Packing: you can optionally include printer margins in the area for packing calculation. In this way, for example, if you have images of 21x29,7cm (A4) you can pack them one per page in an A4 paper size (before, if printer margins were set, the result was a packing not possible message). Here's the new packing dialog:
Added menu (contextual, too) to change link / reveal an image in the Finder.
Constrained movement (shift key) of images strongly improved.
Added tool buttons to show / hide info and edit panels.
QuickLook very improved. Now it shows attributes and image adjusting in the preview / icon of the document.
Added splashScreen.
Known bugs fixed
Drag & drop moving (alt - cmd drag) of an image on the page drawer (to move the image to the page where dropped), now works correctly.
Some setting (preferences) are now saved in the document file itself; only general purpose preferences are stored in the preference file (com.pamarcu.fitplot.plist in Library/preferences in the User folder).
Avoided possible bug when setting the snap preferences to 0 (now is no more possible to be mistaken!).
Other fixing / optimisation not worthing to mention.
FitPlot 3.2
2010-08-25
10.4 Intel, 10.5, 10.6
This long waited version brings many fixes and optimisations as well as a couple of new functions still under development.
These are the new features:
More color space control:
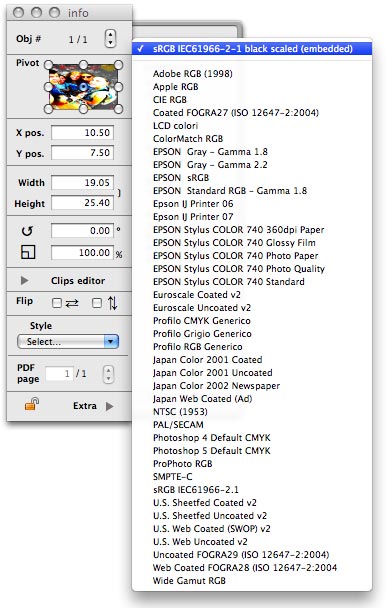
You can change / assign directly the color profile on each inserted raster images (not PDF or eps!) via the info panel. Further explainations in the Usage/About color matching section. Technical note:
this feature is obtained with the Core Image technology adoption.
With Core Image adoption future versions of FitPlot will avail themselves of a series of filters (brightness, contrast, exposure, as well as distortions, blurs etc.), and the ability to take advantage of the graphics card's GPU* processing that perform the calculation faster and lightening CPU task. * Available on FitPlot future versions and with benefit only for computers with compatible GPU.
Batch image substitution tool
You can usually substitute an image double-clicking on it and choosing another one from the file browser. The new feature allows to change all copies of the same images (on the current document) at once. The program knows that an image is present in more than one instance and asks the user if he wants to substitute all same images or just the double-clicked / selected one.
If the image to change is a multipage PDF, each page will mantain the same number in the substitute image (if multipage too) unless that page number does not exists, in such case the page number is set to 1.
PDF multipage expansion:
This feature "expands" and distributes the PDFs with more than one page, creating the needed pages (in one column) and inserting the relative PDF page in each FitPlot page. This could be done in previous versions, but not in a single step.
Registration Marks:
Useful feature in multipage mode. Setting the number of pages, for example 2x3=6 pages, with an overlap of 3 cm (both vertical and horizontal), you have the option to print registration marks very useful to re-join the printed pages. The marks are printed on the four corner of each page (the distance is halfway the overlap value, 1.5 x, 1.5 y from each side) and numbered with a row/column identificator. Other marks are printed alongside in number of one each 4 inches or 10 cm or 250 pts (according with the current unit of measure). See Pagination section for further details.
Quick look support:
Quick look technology, introduced with Apple® MacOs X 10.5 (Leopard), lets you instantly preview the content of a FitPlot file without ever opening it. Just select the FitPlot document in Finder and press the space bar, a window appears, showing you the contents of the file instantly (well, it depends on the more or less heavyness of the file's content!).
Quick look is even able to set the file's icon according with the file's content.
These are the fixes / optimisations:
Imposition -> 2Up saddle stich: pages disposition minor problem corrected.
Packing -> Add new pages: solved a (major) problem that, in some situations, caused a "loop" with consequent program hanging (rainbow cursor).
Pagination -> Undo/Redo: now works correctly.
Undo on images insertion, works again.
Image insertion in multipage mode, now the image is inserted correctly in the current page, not in the page 1 like before.
Minor bug fixed not worthing to mention.
FitPlot 3.0
2009-09-14
MacOsX 10.4 Universal, 10.5
Memory improvements: to encounter the needs of many users working with very big photographic files, I have (hopefully) fixed some memory leaking problem. The program now requires an amount of RAM equal to the sum of the image's sizes (raw sizes, as when opened in Photoshop®) plus the memory occupied by the document undo stack (see the new menu "Clear Undo Stack" here below). That is, more RAM you get, more big images you can import.
Furthermore, copies of the same image on the document, share the same cached original image giving big benefit in duplications and serial duplications jobs.
WARNING: usage of very big images is limited by the impossibility due to the operating system to allocate enough contiguous memory. This limit, in 32 bit systems, is 4GB (virtual), practically there may be problems even with 1GB images if the contiguos space in RAM or virtual RAM is unavailable; in 64 bit systems (when FitPlot will be compiled for the 64 bit architecture) the virtual memory limit rises to 16EB (Exabyte = 2^63 bit) theoretical, practically speaking it should be easy to find some terabyte contiguous. CAUTION: opening a FitPlot document with very big images or inserting one or more very big images could cause memory leaking problems! You notice this by seeing your images appearing as white rectangles or showing (inappropriately) the broken link logo. In such situations you have incurred in a memory leak error (FitPlot is unable to allocate enough memory for your big images). Quit FitPlot, try to reduce images dimension and, to recover memory room, close all unneeded apps. Then relaunch FitPlot ant try again.
New tools added:
Export PDF (corresponding to the File->Export PDF menu item).
Advanced insertion ON / OFF . You can choose to apply or not automatic operations at insertion directly from the tool bar, no need to go in the preference panel. See Advanced Insertion section to know more.
New menus added:
Clear Undo Stack… menu. This new command allows to regain memory resetting the Undo Stack.
It often happens that, inserting and removing many images, especially big ones, these continue to consume memory because you can recover them scrolling back the undo chain. The "Clear Undo Stack…" command clears completely the Undo stack freeing memory, but causing the impossibility to recover again actions done until this point.
Help menu extended to all the main FitPlot topics.
Check version updates. From the 2.9 version you can verify directly from inside FitPlot if a new release is available and, in case, download it (needs an active internet connection, of course!). .
Magnetic guides: usability very improved.
To create a new guide, just click on a ruler area and drag the mouse on the drawing.
Click and drag a guide to move it elsewhere.
Guides snaps on objects leading points (objects must be selected to "attract" guides).
The fasten between guide and point (and vice versa) is evidenced by "snap" sound.
To place exactly a guide, just double-click it and set the value in the showed field .
To get rid of a guide, just drag it out passing over the parallel ruler.
Improving in interface:
The selected page in the drawer (when pages in the document are more than 1) is now well evidenced.
Added a pop up button in the margins dialog to get automatic margin values from the chosen printer (see Test your printer section).
Print and Page Setup dialogs now open as "sheet" tied to the window they refer.
FitPlot 2.9 beta
2009-06-01
MacOsX 10.4 Universal, 10.5
Beta version, not released publicly, has been used to testify the important improvements in memory policy contained in the following 3.0 version.
FitPlot 2.8
2009-03-10
MacOsX 10.4 Universal, 10.5
Magnetic guides: just clicking in the rulers area (vertical or horizontal), you get a magnetic guide. Objects sides easily snap to guides.
To move a guide simply drag its position tracker (triangle) along the ruler.
At the same way, to get rid of a guide, drag its indicator out of the ruler.
Snap distance and guide color are customizable in the preferences panel.
Drag&Drop enhanced: beyond the drag&drop toward FitPlot, it is now available the drag from FitPlot to the desktop or other apps.
You just have to press the alt key (or the alt+cmd keys together) before starting to click and drag the object.
In the first way (alt), releasing the object on the desktop, you'll get a copy of the original referenced image, the other case (alt+cmd), will create an alias of the referenced image.
Dropping objects from FitPlot to other graphic applications should cause the opening of the app or the insertion of the image in the specific program work area.
Drop on the pages drawer: the same way as above, we can drop an object (from the Finder or from FitPlot itself) on any page in the opened pages drawer (see pages drawer in Pagination section).
Dragging an image from the FitPlot area toward the pages drawer, with the same keys combination as seen before, will cause respectively a copy or a displacement of the dropped object in the destination page. The position, relatively to the new page, will be preserved.
Packing: packing algorithm offers some new options.
First of all, to the existing packing modes (single page printer or plotter) it is added the pack in area (the area is user defined describing a rect with the mouse when prompted).
Second point, now you can choose to perform packing on all elements in the document (as it has been before now) or just on a selected set. This way, combined with the pack in area, lets you fill a particular area with some selected images avoiding unwanted move of already placed objects.
Page setup…: a button on the main window (next to the custom sizes and SET controls) makes easier to pick one from the printer driver's page sizes lists. It has the same effect of the File -> Page Setup… menu.
Move object dialog improved: it is now possible to move the current selection of objects (cmd+M) making a copy of it. A further option in the move dialog allows to move the selection to a given page (to choose between the available pages), eventually making a copy.
Other Improving to the interface and some bug fixed:
Cursors in manual editing (when the mouse approaches the pivot handles) are now perfectly reliable.
Grid snap when resizing in now working fine (limited to the sole X snap).
Snaps comprehends also the just implemented magnetic guides.
Keyboard event manager has been revised. Added the turn page with the keys Page Up, Page Down, Home e End (when pages drawer is opened).
Fixed possible bug with color preferences (selections, grid etc.).
Fixed some discovered minor bug.
FitPlot 2.7
2008-12-20
MacOsX 10.4 Universal, 10.5
Log files. Fitplot creates and updates (by default) a couple of file to keep track of your printed jobs. Each printed FitPlot document is recorded in a text file with its informations such as images being printed, paper consumption, date, etc.. These informations can easily be post-elaborated in a spreadsheet or database program for billing or statistic purposes.
Custom text tag. You can enter a text to be displayed as caption for each image.
Adjustable text tag. The new custom text and the other available strings (date, size, file name and file path) can be displayed in a caption adjustable on any of the 4 image's sides.
Constrain max dimension. When you perform a resize by Transformation dialog or even at insertion with auto resizing on, you can choose to constrain the max between height and width to a given value.
Move dialog. Now you can move all selected objects, of a given value, just type command-M and fill the delta X and Y values.
Folders insertion. When inserting images, choosing them from the file browser, now you can select a folder to have all its images content inserted (included the content of nested folders). This works also when dropping a folder to the FitPlot area. A dialog will be presented to warn you when the content exceed a certain amount (currently 10 files or 1024Kb) and the operation can take a long time.
Insert options temporary exclusion. Insert options, if activated in the preferences panel, can be temporarily excluded if, when dropping an image, you hold down the command key.
Linked images tracking. From the 2.1 version was introduced the symbolic link to allow the connection to an image even if it was moved (not removed!). This works fine! The problem, as you may have experienced, arose when, for example, copying the FitPlot document and the linked images on an USB removable device, and opening it on another computer, you noticed all images loose their link.
Now a further improvement has been made. When you save a FitPlot document, even the "relative" path to the linked images is saved, so, if you transfer your work on another independent device, when reopened, images are searched relatively to the FitPlot document new position.
The only advice is now to maintain the relative path between the FitPlot document and its inserted images, for example keeping all the job in a folder.
As a further help, if any images still has not been found, an alert shows up presenting two choices: continue or browse. If you choose to browse, select a folder where the image should reside, all nested folders will be examined (unless the image is already been discovered).
BUG FIXING
Fixed problem affecting 2.6 version and template files that do not opened as "Untitled".
Fixed problem affecting packing multipage on more pages. In some peculiar circumstances an infinite loop could occur.
Fixed problem with "phantom" text tags that could have been seen in some circumstances.
Improved behavior with "broken link" images (see above).
Improved constrained resize. Now, correctly, resizing is made on displayed image size (considering crop, just in case).
FitPlot 2.6
2008-09-01
MacOsX 10.4 Universal, 10.5
New insert options allow to perform resizing, rotating, styling, packing operations on newly inserted images.
Revised packing algorithm. Now there are two ways, one suitable for single page printers and the other for sheet roll printers (plotters).
New transformations tool (takes place of the previous scale command). You can edit / transform a set of selected images changing their sizes / rotation / style in a single operation.
Preferences dialog revised (now it is organized by tabs and comprehends packing and insertion preferences).
New text styles added. Now you can add to images a text tag showing the relative file name, path, size (Kb) and date.
Zoom improved, now you can magnify up to x4. Boxed zoom + and - are available through keyboard (space+command or space+option+command) and click-drag a box around the interested area.
Furthermore you can live zoom using the mouse scroll ball (or scroll wheel) while holding the alt (option) key.
New FitPlot unlocking code system (see here for details).
Other improving in the interface:
Zoom + is centered on the screen portions currently displayed.
Numeric fields in the info panel now accept localized decimal point.
Added contextual help buttons where considered appropriate.
Fixed some discovered minor bug.
FitPlot 2.5
2008-05-31
MacOsX 10.4 Universal, 10.5
Introduced pagination concept: a FitPlot document is no more limited to one page only. See pagination paragraph.
Along with the possibility to have more than one page, the export as pdf behavior has been extended to all pages in the FitPlot document. This has obliged me to abandon the 10.3.9 support (technically speaking, the PDFKit framework is not supported prior the 10.4 system release). Older FitPlot versions, until the 2.2, shall continue to work, of course, on MacOSX 10.3.9 too.
Now alignments, centering and packing refers always to the currently active page (if there are more than just the default one).
Imposition tools: this is a valuable tool (at least in my daily work). With imposition you can control the layout of a multipage PDF to obtain a disposition on your printer sheet to have a ready to stich booklet. See imposition paragraph.
Numerical clipping available from the info/edit panel. Now is possible to clip numerically, not only manually, all 4 sides, typing the value in the respective fields.
The site and help files have been completely revised. FitPlot has grown too much to reside in a single HTML page. Now you can find a more logic "by topic" subdivision.
Bug fixing: paste from other programs fixed and enhanced.
Editing much more responsive. When working in HiRes, each manual editing (moving, clipping, rotating, scaling) will be made in LoRes during the operation. Also the continuos updating of the thumbnail image that caused slowdowns, especially with large PDF images has been fixed. Now thumbnail image is updated only when strictly needed.
FitPlot 2.2
2008-03-01
MacOsX 10.3.9, 10.4 Universal, 10.5
New clipping function: now you can manually clip an image just clicking and dragging the side's handles.
Packing. Now the name of the application "fits" better its meaning. I have introduced a first raw attempt of packing algorithm. Clicking on the packing tool (or choosing the packing menu item), you can obtain a packing of the images placed in the sheet toward the top of the page, optionally giving the chance to the paper to auto-resize.
Scale menu (more objects at once). Now you can scale objects in a selection in a single operation (menu scale).
Export as pdf. Now available from the file menu.
Interface improving:
Now an indeterminate progress indicator (
spinning wheel) is showed while computer is taking its time (importing images, packing etc.).When importing / dropping multiple images, they will be placed with a 10x10 pixels offset from each other (before they where placed overlapped).
Flip operations now have the undo counterpart.
As above, the style operations have their undo.
Other not worthing to mention.
Bug fixing: some (not important) bug discovered has been fixed. Nothing worth to mention.
FitPlot 2.1
2007-11-16
MacOsX 10.3.9, 10.4 Universal, 10.5
Pasteboard images behavior enhanced: pasteboard images now can be saved: this is discussed in the preferences panel paragraph.
Use of symbolic link: a symbolic link allow to connect a file to its path even if it has moved (not removed!). It uses the alias technique.
New styles: styles has been deeply revised. Now you can choose to have trims, shadow, transparency (on pdf, tiffs with mask, png with transparency), dashes and strokes of various flavours on each image. According to this, the shadow and transparency options in the general preferences has been removed, since they have become individual images options. You can set a style on a selected set of images (all images are modified at once) from the tool -> object print style menu (or contextual menu), or on the super-selected image with the info panel (style popup).
New tools: added the cut, copy, paste, duplicate, open, save, new, undo, redo tools.
added the tool insert (to insert an image browsing the disk, instead of the drag & drop way).
added the serial duplicate tool: to reproduce one (or even more) images in rows x columns at user distance (x and y).
Revised preferences:
Page color joins the other color settings.
Grid step configurable for the three units available.
GUI enhancements: now the program use menu and tools validations. Menus and tools are enabled / disabled according with the what you can do in that moment.
Bug fixing: undoing after an object movement (with snap to grid on), caused the object to be repositioned slightly distant from where it was. Now it works correctly!
FitPlot 2.0
2007-10-19
MacOsX 10.3.9, 10.4 Universal, 10.5
Revised the graphic interface with the introduction of a customizable toolbar in perfect Apple style. Here you can choose your preferred tools and settings. More tools will come in future versions and on user suggestions.
Manual editing: added a free object transformation. With this option enabled you can freely resize and rotate images around a chosen pivot (
). Selecting an object, 9 handles appears on the image borders (and center). Around the handles there are sensible areas where you can see your mouse cursor change according with the operation you can perform on that object. Click and drag to perform operations.
Added custom page size input fields to avoid the tedious Page Setup dialog. At the moment it is not possible to save the new page size int the known page sizes list (visible in the Page Setup dialog). It is possible, however, to save it as FitPlot template.
Added width and height fields in the info panel to constrain either W or H to a given length. The scale, at this moment is always proportional (scale X = scale Y).
Box selection. Added the possibility to select objects clicking dragging a box with the mouse.
Added undo on the change link operation.
Fixed some minor bug.
FitPlot 1.9
2007-09-07
MacOsX 10.3.9, 10.4 Universal
FitPlot is now localizable. Italian version joins the original English version.
Added flip horizontal and vertical transformations.
Added center in the printable area (alignment menu).
Added reveal in Finder push button.
Added new object styles.
Fixed some interface bug:
Info window position is now saved in the preferences.
Undo while moving / scaling / rotating object via edit fields in the info panel now acts correctly.
FitPlot 1.8
2007-07-06
MacOsX 10.3.9, 10.4 Universal
Universal, at last! FitPlot has been compiled for the Intel based Macs. Several bugs involving the use of the program under emulation has been fixed.
Enhanced info panel. The info panel has been expanded with an extra drawer showing path, image type, size (Kb), dimensions and bounds of the selected image (if any).
Added a thumbnail of the selected image.
Added a Change link push button to replace the selected image with another (see below, editable link).
Added a preference panel to set/save general preferences (common to all open documents).
Lock / Unlock. Added the possibility to lock / unlock objects to prevent unavoided movements.
PDF/tiff multipage support. A new very important feature is the possibility to select via info panel the desired page in a multipage pdf (or tif).
Multifile dropping. Another important improvement is that now you can drop on the program window more than just one file at once.
Resolution switch. Now you can set high / low screen resolution for the displayed objects. Printer devices, as always, use their best resolution.
Editable link. Last, but not least, double click on an object brings up the file browser letting you substitute the image with a new one.
User experience has been improved introducing move view and zoom controls with the mouse:
move view tool: clicking on the spacebar you can move the view around (as in Adobe Photoshop).
zoom tools: click with the mouse while holding down space+command keys to obtain a one step zoom+. Click with the mouse while holding down space+command+option to obtain a one step zoom-.
According to the above, cursors have been revised so you will see a simple arrow while mouse is in a neutral area and a pointing hand while the mouse is over an object.
Some discovered bugs have been fixed and some minor aesthetic changes have been done (for example, selection ring weight now is no more tied to zoom or scale values, and so are trim lines and contour).
FitPlot 1.5
2007-02-14
MacOsX 10.3.9, 10.4 under Rosetta
In 1.5 version an info/edit panel has been introduced. With this tool you can control numerically position, rotation, style and even scaling of each object.
Scaling objects is another important feature introduced in FitPlot 1.5.
Rotation is no more limited to 45/90 degrees, but it is free (via the info window).
Both rotation and scaling take the "pivot" as tie for operations
Some discovered bug has been fixed, the most important was the drag-copy of objects. The copy was not consistent with the original, but a low resolution copy. Now this it has been fixed, more, the copy reflects scaling, rotation and style of the original.
FitPlot 1.1
2006-12-28
MacOsX 10.3.9, 10.4 under Rosetta
FitPlot is now a full document based application. Now you can save your work for later printing.
Undo / redo is now available for all objects operations.
Now you can save and collect your models (templates) to easy retrieve them. A new template file architecture enables you to prepare as many format as you want for any printer/plotter to have them quickly at your disposal (avoiding to call the page setup each time you need a new sheet format).
The program has become shareware. A watermark will be printed on the center of the sheet unless you request the password to avoid this.