With the Packing tool the name of the application "fits" better its meaning. I have introduced a first raw attempt of packing algorithm.
Clicking on the packing tool (or choosing the packing menu item), you can obtain a distribution of the images toward the top of the page.
The pack… command brings up the following dialog:
There are three types of packing:
Add new pages (suitable for single page printers)
Expand / shrink print area (suitable for roll plotters)
Pack in area (defined by user)
Add new pages:
In this case the algorithm try to fit the images in the current page. When there is no place left, a new page is added and the fitting continues until all images are placed. In the end, all pages are showed in the pages drawer.
Expand / shrink print area:
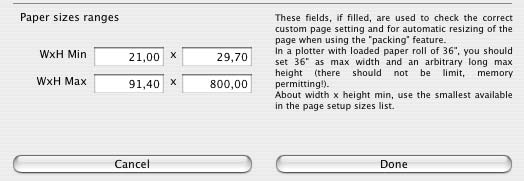
The images are fitted adapting the single page length / width (the page is in fact considered as a roll). For this particular case (auto-resize), 4 new fields have been introduced in the margins setup dialog with min and max paper sizes for the current printer. With this informations the program knows how to expand / shrink the paper size according with the packed images on the document.
With these informations the algorithm can know how to expand / shrink the page size for a best distribution of the image s on the sheet [see note at bottom of this page].
Pack in area: images are placed inside an area that the user should define once prompted.
When exiting the packing dialog the following message will be showed:
At this point we should define an area with the mouse (click and drag) to contain images to pack. To make easier this operation, before to start to click and drag, you can zoom out, scroll and do all is needed to see the whole area to select.
After the click and drag, when the mouse is released, if it is possible, images to pack will be fitted in the just defined area.
The other options in the packing dialog are described here below:
Gap: if you want your images packed leaving a space around their perimeter (to have space for trims etc.), then type some value in the gap field.
Allow 90 degrees rotation: if you check this, the algorithm knows that images can be rotated, so, if there is a convenience, some image may be rotated for a better packing result.
Do not consider margins: there are several cases where the image size coincides with the page size (think of an A4 pdf). In such cases, normal packing (one image per page), will not work unless you do not check this item. In this way the whole page size is eligible to be the bound of your image. Important Note: if still a warning shows up telling there is no room to fit the page, this may be caused by small decimal differences between sizes. Check and change sizes (of your image and page) temporarily using points as unit of measure instead of inches or centimeters. This little problem will be better solved in the next version.
Pack only selected objects: with this option you can pack only a set of selected images (for example to fill a particular area with some images, leaving the other untouched). Note that with the automatic packing (available optionally at insertion, see advanced insertion section), images just imported are the only ones to be selected.
Pack all objects: this is the default packing. It acts on all the objects currently in the document, independently from their selection.
Save settings: you can save the packing settings in the preferences in order to memorize these values. These settings are used by some automatic task at images insertion. Furthermore, you can pack images at any moment bypassing the packing dialog holding the option key while clicking the packing tool . The packing type and settings used will be the ones saved in the preferences.
Disclaimer: this packing algorithm is far to be perfect. This kind of problems is well known in computer science as 2D bin packing problem. Unfortunately there is not a solution, unless you enumerate all rectangles combinations, paying the bill of time processing increasing factorially! The algorithm FitPlot uses for this operation is very fast and suitable for most cases but far to be perfect. There will be situations where a simple human glance can see a better disposition than that suggested by FitPlot. I hope to improve this in future releases, however, suggestions from experts out there are well accepted.
Margin setting (for packing algorithm)
Choose setup Margins from the Tools menu and fill the fields for page ranges.
You should take your plotter minimum size from the page setup menu (the smallest in the paper size list). About the maximum size, width should correspond to the loaded plotter roll (24", 36", 42" ecc.), height may be set to an arbitrary long value (I have set it to 6 meters [about 236"] on my HP Designjet 500PS with no problem at all). NOTE: If all ranges fields are 0, they will not be considered in the packing algorithm.