| Keyer v1.0 | Keyer v2.1 | Keyer v2.2 | YO7LHC | PIC Projects | IK0WRB | Home page |
To know what is a keyer and what it's supposed to do, and also for a general description
of the circuit I designed, please read the page about
version 1.0 of the keyer.
I will describe here only the changes I made in version 2.0.
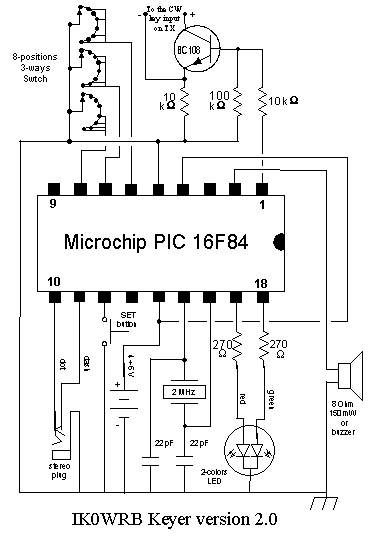
As you can see, it is quite similar to the version 1.0 circuit. The only differences are that you don't need a second optional button and you must use a 3-ways 8-positions switch. Please note that the switch may be replaced by a 3 bits contraves, but if you looks for contraves it's better you buy a 4-bits contraves and use version 2.1 of the keyer.
a Microchip PIC 16F84, in the 18 pins package
a 2 MHz quartz crystal, parallel resonance
2 capacitors of 22 pF, 15 VL
2 resistors of 270 Ohm, ¼ Watt
a resistor of 100 kOhm, ¼ W
2 resistors of 10 kOhm, ¼ W
a 2-colors LED, common cathod, red and green
a button, normally open
2 jack plugs, 3 poles (stereo)
a loudspeaker, 4 - 8 Ohm 150 mW, or a buzzer
a BC108 transistor, or similar
a 3-ways 8-positions switch (or a 3 bits contraves switch)
You can download here the hex module you need to program the Microchip PIC 16F84
chip you need for keyer. This is the software for version 2.0 of the keyer.
New versions of the circuit (and related software) may be released in the future.
The use of the keyer is basically identical to
version 1.0 of the keyer. But setting parameters and
moving to the different states is far more quick and simple, thanks to the presence
of the switch. Moreover the LED is now used to signal the setting of some parameters.
The switch can be set to 8 different positions and each one is a different state
of the keyer.
The following table shows how to operate the keyer version 2.0.
| Switch position |
Status | LED color | Left paddle | Right paddle | SET button |
|---|---|---|---|---|---|
| 1 | Ready | Green while rx. Red while tx. Yellow if tx local. |
Dot | Dash | Send single CQ message |
| 2 | Speed | Yellow | Decrease speed | Increase speed | Sound current speed (Snn) |
| 3 | Weighting | Yellow | Decrease weight | Increase weight | Sound current weight (Wn or Wn.5) |
| 4 | TX | Green if disabled. Yellow if enabled. |
Enable transmitter | Disable transmitter, enable speaker | Sound status (TY or TN) |
| 5 | Audio | Green if disabled. Yellow if enabled. |
Enable audio monitor | Disable audio monitor | Sound status (AY or AN) |
| 6 | Beacon | Green if message present. Off if no message. |
Starts Beacon sequence. During carrier: immediate call. |
During call: go to carrier. During carrier: more carrier. |
Starts Beacon sequence. During tx or pause: stops Beacon sequence. |
| Autostart beacon sequence at power on | |||||
| 7 | CQ | Green if message present. Off if no message. |
Starts CQ sequence. During pause: immediate CQ. |
During CQ: go to pause. During pause: more pause. |
Starts CQ sequence. During CQ or pause: stops sequence |
| 8 | Enter | Green | Store a dot | Store a dash | Single pressure: insert inter-word space. 2 consecutive pressures: delete last char. |
| Store an inter-character space when pausing 0.25 sec. | |||||
| Keyer v1.0 | Keyer v2.1 | Keyer v2.2 | YO7LHC | PIC Projects | IK0WRB | Home page |