| Keyer v2.0 | Keyer v2.1 | Keyer v2.2 | YO7LHC | PIC Projects | IK0WRB | Prima pagina |
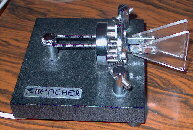
A keyer is an electronic circuit connected to a two-paddle Morse key (a.k.a. bencher
key or horizontal key or automatic key or iambic key) and to a radio transmitter.
Left paddle transmits dots, while right paddle transmits dashes. Pushing the right
paddle while keeping pressed the left one, transmits a dot, then a dash and another dot.
Keeping pressed the two paddles, continues the dot-dash sequence, until one of the
paddles is released.
The same thing happen if you press the right dash and then the left, resulting in
a dash-dot sequence.
Transmitting this way is far more simple and quick than using a standard vertical
Morse key, thus many radio amateurs use iambic keys. Modern transmitters have the
keyer circuit built in. An external keyer, like this one, is useful for old
transmitters and also for new ones, because of the other features it delivers:
the message memory, the beacon mode, the possibility to practice Morse.

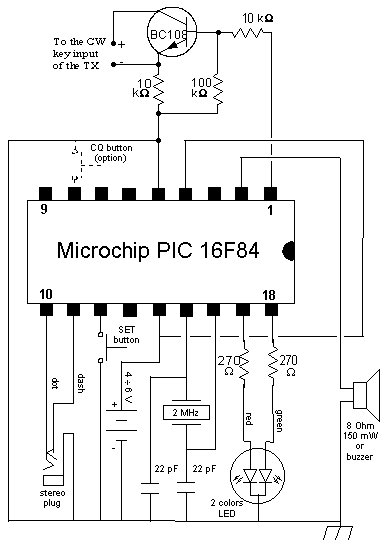
My keyer is based on a Microchip PIC 16F84 microcontroller and it uses a small
number of components. You only need a quarz crystal, a transistor and a few
capacitors, resistors and connectors, plus a small speaker and a button.
By the way you also need a small box and some batteries, just to give the
3.5 to 5 Volt DC the keyer need. The current is below 30 mA at most, with
led glowing yellow and the speaker on. During pauses current drops to less
than 20 mA and to only a few microamperes in sleep mode (there is no on/off switch).
A printed circuit board is not mandatory for this circuit, because of the small
number of components.
If you are lucky enough to live not too far from my home (which is unlikely if
you are reading in English), I'd be happy to give you one chip programmed with
the keyer software I developed for this project.
Otherwise, keep reading and you will find the hex module you must put
inside the 16F84 chip. If you don't have a chip programmer circuit, normally
connected to the serial or parallel port of your computer, you can buy it
or look for a radio amateur owning it and kind enough to program the chip for you.

A Microchip PIC 16F84, in the 18 pins package
A quartz crystal of 2 MHz, parallel resonance
2 capacitors 22 pF, 15 VL
2 resistors 270 Ohm, ¼ Watt
A resistor 100 kOhm, ¼ W
2 resistors 10 kOhm, ¼ W
A 2-colors LED, common cathod, red and green
A button, normally open
2 jack plugs, 3 poles (stereo)
A loudspeaker, 4 - 8 Ohm 150 mW, or a buzzer
A BC108 transistor or similar
One more button (optional) normally open
You can download here the hex module you need to program the Microchip PIC 16F84
chip you need for the keyer. This is the software for version 1.0 of the keyer.
New versions of the circuit (and the related software) may be released in the future.
When you connect batteries (4 NiCd AA or AAA size are perfect), the keyer will
sound my call sign (I K 0 W R B) and then, after a short pause, the letter R,
signaling that it is in the Ready state, with the green led lit.
Manipulating the iambic key will produce the result you expect, keying the
transmitter (the led becomes red when the carrier is transmitted). Base speed is
set at 20 wpm and the weighting is set to 3, speaker is enabled and CQ mode disabled.
Pressing one or more times the SET button, will move the keyer to different states and
the paddle can thus be used to change speed and weight, to enable of disable the
trasmitter (you may want to practice Morse or test CQs offline), enable or
disable the speaker while transmitting (for example if you hear in the headphone
the monitor tone of your rtx), store a message in the memory and recall it as
a repeating CQ message, possibly in the beacon mode.
All the parameters are changed using only the CW key and the SET button and they
are immediately stored in the EEPROM memory onboard, so they are never lost,
even when batteries are totally dead.
The following table shows how to change the keyer parameters.
| Status | Speaker prompt |
Left paddle | Right paddle | SET button |
|---|---|---|---|---|
| Ready | R | Dot | Dash | Go to Speed |
| Speed | Snn | Decrease speed | Increase speed | Go to Read (if speed has been changed), otherwise go to Weight |
| Weight | Wn or Wn.5 | Decrease weight | Increase weight | Go to TX |
| TX | TX? | Enable transmitter | Disable transmitter, enable speaker | Go to Monitor (if tx enabled), otherwise go to Message |
| Monitor | MO? | Enable speaker | Disable speaker | Go to Message |
| Message | MSG? | Store a dot | Store a dash | End of recording |
| Store an inter-character space when pausing 0.25 sec. | ||||
| CQ | CQ? | Enable CQ calls (message memory) | Disable CQ calls | Go to Ready (if CQ enabled), otherwise go to Beacon |
| Beacon | BC? | Enable beacon mode during CQ | Disable beacon mode during CQ | Go to Ready |
Speed can be changed with a 1 wpm step, from 4 to 66 wpm (too much?).
Weighting can be set from 2 to 5, with a step of 0.5
CQ message stored in the memory can be about 230 signs long, where
a sign can be a dot, a dash or an inter-character space. If the memory is full
while storing, the keyer go back to Ready mode, retaining the message stored
up to that point. The message is in the EEPROM, so it's never lost, unless
you decide to store another one.
CQ mode: when you enable CQ mode and go back to Ready, the keyer starts
transmitting what is inside the message memory, then waits 10 seconds, then
trasmits the message again. If you press the right paddle, the keyer stops cycling,
while the left paddle (while receiving) sends immediately another CQ.
Beacon mode is an option of CQ mode. The keyer transmits the message memory,
but waiting each time 20 seconds, with carrier ON, like a beacon is supposed to do.
In this state, if there is a black out (you change batteries or they are dead or
an external supply fails) and then the power comes back, the keyer will start
transmitting immediately. This is thought for unattended beacon stations, mainly.
The optional second button lets you go to CQ mode and start transmitting with
just a single button pression, instead of cycling through parameters and enable
CQ mode. If you do contests, this is very nice! But you can also wait a little
for the second version of the keyer, where you probably will not need a second button
for this feature.
There is no on/off switch, because the keyer goes into sleep mode after about
33 seconds of inactivity. A pression of one of the paddles or the SET button, awakes
the chip and the keyer continues its activity, as if it had been always on. In sleep mode the circuit drains
less than 10 microamperes, comparable to the auto-discharge of batteries.
| Keyer v2.0 | Keyer v2.1 | Keyer v2.2 | YO7LHC | PIC Projects | IK0WRB | Prima pagina |