Imposition applies to a multipage PDF we want to prepare for the layout of a book / booklet.
According with the parameters we input, PDF will be replicated for the number of pages it contains (or a subset we have selected).
Each duplicate, comprised the original one, will be set to represent a convenient page, page that will be moved and, in case, rotated at a place determined by our choices in the imposition dialog.
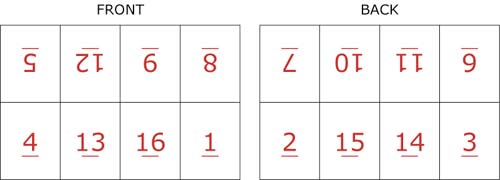
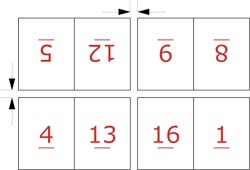
Fig. 1 - 16 pages imposition
Foreword
Since the 2.5 version FitPlot introduces the concept of pagination (exposed here).
A FitPlot document is no more limited to one page only, corresponding to the area it represents.
Now document area extends indefinitely toward the right and the bottom and can be encapsulated into a grid of "cells" (horizontal x vertical pages) each one corresponding to the current page setup.
About pagination and imposition you just have to know that the print formats will be positioned in 2 columns: the left column will contain the booklet "recto" pages, the right column the "verso" pages.
According to the number of booklet pages and to its subdivision in pages per format, the algorithm will calculate how many (vertical) formats it will need.
As we will see in the following, we can have until 16 pages per format, so it's up to us to predetermine the format size.
Let's start
Insert the PDF to impose.
Think about how many pages of the final booklet size can found place in a single printer sheet. According to this, set the sheet size (page setup or quick page size). In case resize the PDF. Do not rotate the PDF!.
With PDF selected, choose menu File -> Imposition… (or the relative tool in the toolbar). If the menu is grayed, then the PDF is not a PDF or it has one page only or you have selected nothing.
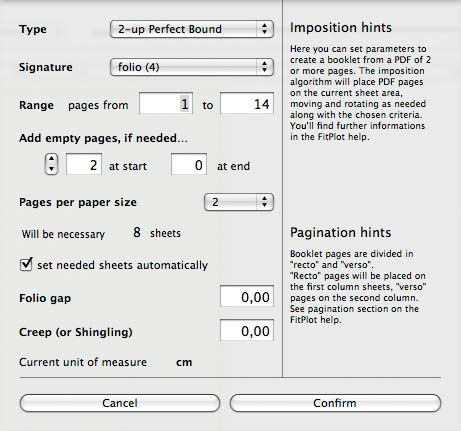
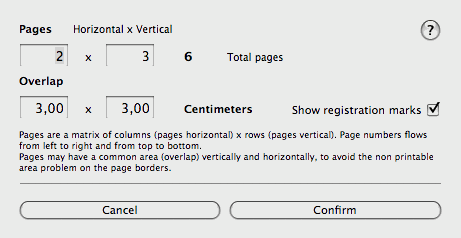
After selecting the imposition command, the dialog in fig. 2 should appear.
Fig. 2 - The imposition dialog
Possible configurations
Type
Two types of binding are currently available:
2-up Saddle Stich
2-up Perfect bound
2-Up Perfect bound
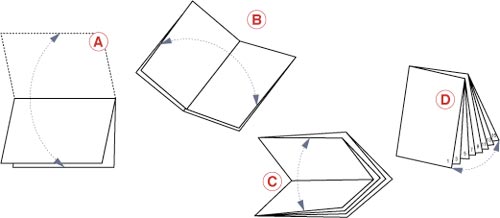
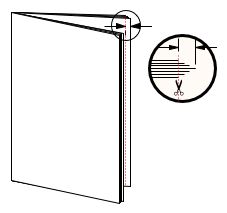
Pages are printed on the printer sheet according to a pattern such that, after folding the sheet as in fig. 3, we get the right page order.
Along with the number of pages in a single sheet, we have a different signature (see signatures later), hence a different number of foldings to do.
In fig. 1 we have seen an octavo signature that contains 16 pages (8 recto + 8 verso) that needs 3 foldings.
Once folded, signature has to be trimmed to "free" tied pages, hence it may be needed to leave a margin of safety for this operation (see folio gap later).
Total pages have to be a multiple of the chosen signature (see signatures later), hence, if they are not enough, blank places will be left (see adding lacking pages).
Fig. 3 - 2-Up Perfect bound
2-Up Saddle Stich
If our output device has a small page size and the maximum pages per format is 2, then the 2-up saddle stich is more suitable.
The booklet is composed of folio (4 pages per sheet), see fig. 4.
Total pages have to be a multiple of 4, so lacking pages will be added (see add lacking pages later).
Even in the 2-up saddle stich you can choose to have 4, 8 or 16 pages per format. In such cases total pages will be a multiple of 8, 16 or 32 respectively and lacking pages will be added, as just above said.
A quick way to print a booklet with a desktop A4 printer is the following:
Use the A4 as a folio (4 pages). The booklet final size will be A5.
Choose 2-up saddle stich imposition.
Wait FitPlot to make the imposition then print only the first column of generated pages using the print odd pages only in the print dialog option.
Reposition the just printed sheets in the printer paper tray in order to print on the blank side.
From the print dialog options, this time choose even pages only et voila!
Fig. 4 - 2-Up Saddle Stich
Signature
folio (4)
quarto (8)
octavo (16)
sextodecimo (32)
This popup is enabled only if the imposition type is the "2Up Perfect Bound" type.
Pages will be framed according with the chosen signature.
The bracketed number indicate how many pages (or multiples) are possible with that kind of signature.
For example folio is made of a sheet folded in two, obtaining 4 sides (pages).
Folding again, we have the quarto (see fig. 3) obtaining 8 pages. Folding again we obtain the other possible signatures.
The size of a modern book is based on the printing area of a common flatbed press.
The pages of type were arranged and clamped in a frame, so that when printed on a sheet of paper the full size of the press, the pages would be right side up and in order when the sheet was folded (see fig. 3), and the folded edges trimmed.
The most common book sizes are:
Folio: up to 15" (ca 38 cm) tall.
Quarto: (4to): the sheet of paper is folded twice, forming four leaves (eight pages) approximately 11-13 inches (ca 30 cm) tall.
Octavo: (8vo): the most common size for current hardcover books. The sheet is folded three times into eight leaves (16 pages) up to 9 ¾" (ca 23 cm) tall.
Sextodecimo: (16mo): the sheet is folded four times, forming sixteen leaves (32 pages) up to 6 ¾" (ca 15 cm) tall
Pages range
Here we can choose a subset of the total PDF to impose.
Add blank pages
If needed, blank pages will be added (that is empty spaces will be left at "blank pages" place) to complete the signature or the "pages per format" quantity.
For example, to print in a "Sextodecimo (32)" a PDF that has only 30 pages, the 2 lacking pages have to be generated, hence 2 blank spaces will be left in place of the 2 lacking pages.
We can decide where to put these blank pages (how many at the beginning, how many at the end).
Keep in mind that left pages are always even numbers and the right ones are odd numbers!
Pages per sheet
According to available printer page sizes and to final booklet dimension, we can decide how many pages could fill one print sheet.
It is important to establish this value before to make the imposition. NOTE: If we decide to change the page size after the imposition, pages will be misplaced, so it will be necessary to start over with a new imposition. Simply delete all generated images leaving only one that has not been rotated then restart the imposition with the new page size.
Needed sheets
This value indicates how many sheets will be needed for the pagination settings (see pagination) with the current configuration.
Set needed sheets automatically
If selected, this option instruct the algorithm to generate the needed sheets as indicated in the point above.
Folio gap
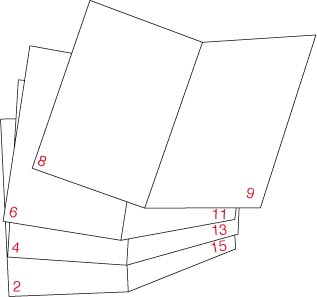
In the imposition process pages are grouped in folio (2 adjacent pages, see Fig. 5).
Setting a distance between folios can ease trim operations.
Typed value is in the current unit of measure, as indicated in the dialog.
Fig. 5 - Folio gap
Creep
The creep value correct the shifting we have inserting inner folios into the outer folio.
This is due to the page thickness (see fig. 6). Pages will be opportunely shifted of a value from zero (inner folio) to the typed value (outer folio), proportionally to their order in the assembling stack.
Typed value is in the current unit of measure, as indicated in the dialog.
To know exactly the value of the creep, build up a real sample, folding the needed amount* of sheets of the same paper you are going to use.
[*The amount of sheets you have to fold for the sample is calculated for the 2 Up Stitched dividing the total pages by 4, for the 2 Up Perfect Bound, dividing the signature value (the bracketed number, 32, 16, 8 or 4) by 4.]
Measure the creep value as indicated in fig. 6.
Fig. 6 - Creep
And after?
Once confirmed, it may take some time to duplicate and rearrange all pages.
At the end you'll see the pages in the current sheet. To see (and print) the other pages that are in the other sheets, if you have not enabled the automatic setting needed sheet (see above), activate the pagination dialog from the File->Pagination or from the pagination command in the toolbar, (see fig. 7).
Fig. 7 - Pagination dialog
Set the horizontal pages value to 2 and the vertical value to the amount of PDF pages divided by the number of pages per format, divided again by 2 (because we have already 2 in the horizontal value). NOTE: Overlap values has to be zero.
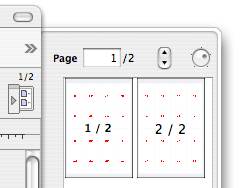
Now you can open the pagination drawer clicking the button at the top right of the main FitPlot window (see fig. 8).
Fig. 8 - Pagination drawer with recto and verso pages
You should see in the first column the "recto" pages and in the second the "verso" pages.
Now it's easy to proceed with the print, using the print odd pages only in the print dialog option, then repositioning the just printed sheets in the printer paper tray in order to print on the blank side.
Then, choose File->Print again and in the print dialog options, this time choose even pages only.
At the end you should have a print recto/verso of your booklet. Last thing left is to fold, trim and stitch.