|

Scheme
Component
Support MG-2
| |
Advanced configuration of the interface
PC / Nokia
The preceding configuration represents what I could define "
entry level ", the costs i have contained relatively, unfortunately I don't consider
it satisfactory from the aesthetical point of view.
Subsequently I have passed to this configuration, surely of great effect, thanks also to
the happy marriage between the black plastic container and the support original Nokia
Modello MBC-1. This support has a " defect ", he can be used with the connectors
tightened Nokia, if you use a standard connector you don't succeed in connecting it to the
jail cell when this is lodged on the support MBC-1.
You have two solutions:
To acquire the kit vivavoce original Nokia, will find the correct connector but you will
spend a lot, or to get off that normal and to follow my instructions. Have opted naturally
for the second solution!
You turn upside-down the support MBC-1, you take the inferior outline with a transparent
velina and you realize the " fund " that of now in before I will call Satellite.
You use some black plastics in way from to respect the most possible a some aesthetical
taste. (you see photo). This Satellite will have to lodge the essential part of the
connector that you will have to get off.... first fairies of the experiments with some
rigid cardboard. 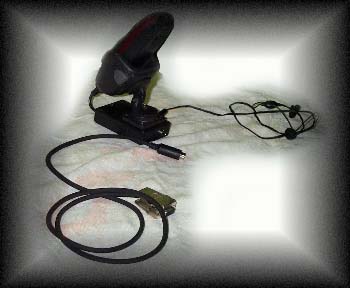 You now take in hand the connector of the kit
vivavoce, you remove the two grapevines, you open the " hull ", you remove the
metallic anchorages, he will remain only in hand what it uses. Join the pin 3, 5 and 9 with a welder of low power (15W). You
now create a buttonhole in the Satellite to lodge the naked connector, you always try
first with a rigid cardboard, and fix you him to the Satellite. You now take in hand the connector of the kit
vivavoce, you remove the two grapevines, you open the " hull ", you remove the
metallic anchorages, he will remain only in hand what it uses. Join the pin 3, 5 and 9 with a welder of low power (15W). You
now create a buttonhole in the Satellite to lodge the naked connector, you always try
first with a rigid cardboard, and fix you him to the Satellite.
I have also resolved the aesthetical problem of the fixing; enough in fact to take 7 or 8
black grapevines of two cassettes audio, hold aside her they will use presto! to fix
the connector to the Satellite 2 grapevines they are enough, the others 6 serve for
staring at the Satellite at the base of the support Nokia MBC-1.
You perforate the Satellite in proximity of the edges, you use a point from 1mm, you
insert the Nokia in the support and you turn upside-down the everything. You position the
Satellite that you have perforated on the support in this way verified the correct
positioning. You use the Satellite perforated as it disguises for effecting the holes with
precision at the base of the Support Nokia Modello MBC-1. Perforated the support with the
point from 1mm the Satellite that you had already perforated and you widen the holes using
a point from 1,5mm take. This will facilitate you the operations of fixing considering
that we use some grapevines autofilettanti. If the grapevines are thicker increase of
0,5mm the diameter of the points!
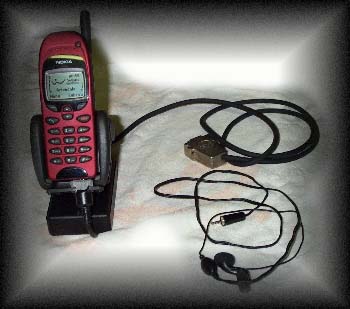
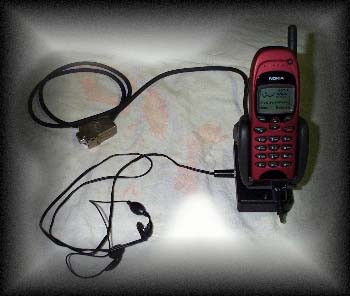
Compliments! To this point you will have adjourned the support Nokia Model MBC-1, that I
rechristen: Support MG-2. (Initial of my name). You lodge your Nokia to verify the
mechanical correspondence of the whole again. Don't worry any fact what any cable has
connected in the inferior part!
 In the second photo you see the sight back of my
support, you notice that the cable that originates from the door seriale of the PC has not
fixed to the container, I have used a connector flying virile mini dins to 5 poles. On the
back of the container that contains the interface I have inserted the connector female
mini dins to 5 poles. In the second photo you see the sight back of my
support, you notice that the cable that originates from the door seriale of the PC has not
fixed to the container, I have used a connector flying virile mini dins to 5 poles. On the
back of the container that contains the interface I have inserted the connector female
mini dins to 5 poles.
I have chosen of to use a flying connector, rather than from panel, in how much I can use
the heart for the container while, the external part, will serve me from " scabbard
" on the fa�ade of the support to disguise the cable that originates from the
container decently. E' directed to the connector Nokia that have realized first!
When I receive a phone call I can move from I study it without duty to reach the back of
the PC or however without duty to manage cables penzolanti. The earphone is inserted with
a normal mini stereo jack, place the support and converges comfortably! If I desire to
connect my Nokia 6150 to the PC it is enough me to connect it with the connector that
sprouts me from the base of my Tower, I have a good visibility of the display and some
satisfaction for the aesthetical result. This interface as the preceding one has also
provided of a red LED that the correct communication signals me between the Nokia and the
PC. To rest the LED has turned on, I am so sure that the connector DB9 are correctly
connected to the door seriale of the PC. Hardly I use the software of communication, of
management loghi etc. the LED is extinguished confirming the perfect exchange of data. We
now go to analyze the inside of the container to see how we have cabled the device. The container.........


|