RFID Sensor[2007.05.11] |
 |
|
RFIDSensor simulates a RFID reader and is used to detect RFID tags that are in sensor range. It allows also to read and write their memory. RFID tags can be added in the virtual world both from UnrealEd or can be dynamically released by the RFIDReleaser effecter.
Refer to http://en.wikipedia.org/wiki/RFID for further information on RFID technology.
Like any other USARSim class, the sensor can be configured from the USARBot.ini file. In the [USARBot.RFIDSensor]
section you can set these parameters:
Radius and Obstacle mode parameters:
Attenuation mode parameters:
Other parameters:
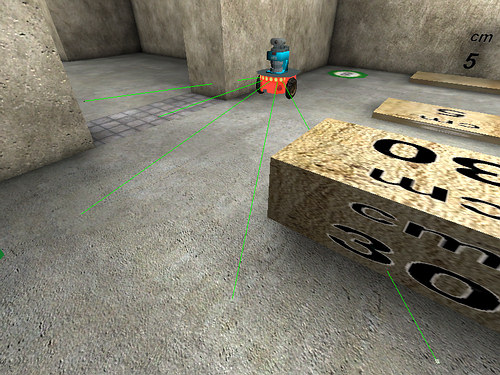
Radius mode only takes into account the sensor range (MaxRange). The sensor can read any tag in this range ignoring obstacles.
 |
SensingMode: Radius |
Traced lines (if bTraceRFIDs is true): all the lines are green.
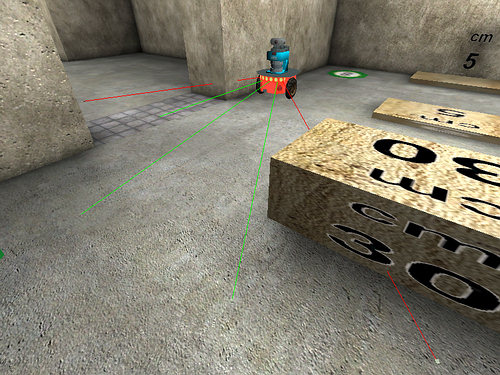
Obstacle mode is the same as Radius, but it also takes into account obstacles. Tags that are in sensor range but lie behind an obstacle are invisible to the sensor.
 |
SensingMode: Obstacle |
Traced lines (if bTraceRFIDs is true): green lines for reachable tags, red lines for hidden tags.
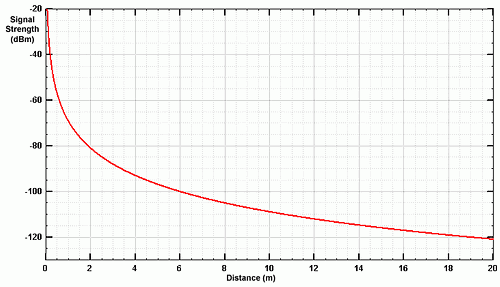
Attenuation mode uses a signal attenuation model. It consider both distance and obstacles. The signal strength is function of the transmitter power (dBmTXPower) and distance:
![]()
(from: MaxStram Application Note - Indoor Path Loss)
note: the factor 2 means that we are considering forward and backward propagation (considering the passive tag as the source of the reflected signal).
 |
Signal strength over distance with dBmTXPower = 36 |
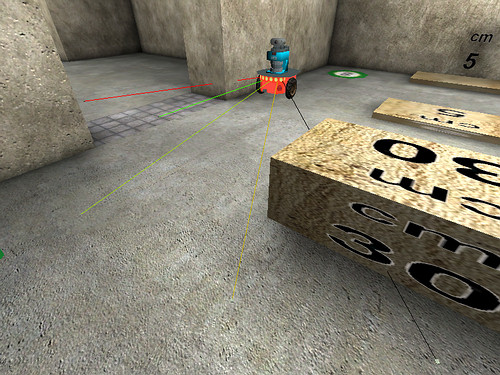
If the received signal is lower than the sensor sensibility (dBmRXSensibility) then the tag is out of range. If there is an obstacle we attenuate the signal by a fixed amount (dBObstacleAttenuation). In this simplified model we consider only one obstacle. This is an acceptable approximation because of the very short range of the passive RFID tags.
 |
SensingMode: Attenuation |
Traced lines (if bTraceRFIDs is true): line color represent the signal strength (from green to red). If the signal is too low the line is black (tag is unreachable).
When you are near one or more RFIDTags you will receive the following string:
SEN {Type RFID} {Name RFID} {ID 1} {Mem 0}
if you detect one RFID, or:
SEN {Type RFID} {Name RFID} {ID 1} {Mem 0} {ID 2} {Mem 0} ...
if you detect more then one at the same time.
To read the memory of the RFIDTag you can use the following command:
SET {Type RFID} {Name RFID} {Opcode Read} {Params RFIDTagID}
Where RFIDTagID is the ID of the RFIDTag you want to read.
| Success: | RES {Time ...} {Type RFID} {Name RFID} {Status OK} {ID RFIDTagID} {Mem MemoryContent} |
| Failure: | RES {Time ...} {Type RFID} {Name RFID} {Status Failed} |
For example, failure can happen when the RFID tag is out of the sensor range.
Using the same RFIDSensor you can write the RFIDTag memory using this command:
SET {Type RFID} {Name RFID} {Opcode Write} {Params RFIDTagID MemoryContent}
Where RFIDTagID is the ID that identifies the RFIDTag you want to write, MemoryContent is the string you want to write in the RFIDTag.
| Success: | RES {Time ...} {Type RFID} {Name RFID} {Status OK} |
| Failure: | RES {Time ...} {Type RFID} {Name RFID} {Status Failed} |
To erase the RFIDTag memory you can both write a "0" string or, more easily:
SET {Type RFID} {Name RFID} {Opcode Write} {Params RFIDTagID}
Where RFIDTagID is the ID that identifies the RFIDTag you want to erase.
| Success: | RES {Time ...} {Type RFID} {Name RFID} {Status OK} |
| Failure: | RES {Time ...} {Type RFID} {Name RFID} {Status Failed} |
The RFIDSensor is a fast sensor so it will not load the CPU.
The Attenuation mode uses a very approximated model. It could be improved considering more obstacles, antenna gains and tag/sensor relative rotation (anisotropic radiation field). But the disadvantage would be a higher CPU load and a whole pile of new, obscure, parameters.
Another way of improving the RFIDSensor is to adopt a new syntax for its messages :-)