
THE INFORMATION YOU WILL FIND HERE COULD BE INCOMPLETE OR INACCURATE. THE WEBMASTER, PROJECT COORDINATOR, PROJECT CONTRIBUTORS AND WEB SPACE PROVIDER EXPRESSLY DISCLAIM ALL LIABILITY FOR INJURY OR PROPERTY DAMAGE RESULTING FROM THIS INFORMATION.

PLEASE READ THE COMPLETE SAM's SAFETY INFORMATION!!!

CAUTION: There may be a few exposed electrically live parts from the power line, usually around the power cord entrance, power transformer, and on/off switch. If there are, tape them over or cover them somehow so you need not be concerned with a low tech shock! Unless you are troubleshooting a primary side power supply problem, there will be no need to go near the AC line.
PLEASE READ THE COMPLETE SAM's SAFETY INFORMATION!!!
WARNING: Normal safety checks are disabled in TEST mode. Thus, the laser may remain on as long as focus/tracking/spindle servos are engaged even if no disc is in place. Take care.
The laser in a CD player is infra red, near IR - 780 nm - border of visible range but for all intents and purposes invisible. However, it is very low power (generally under 1 mW at the lens) and due to the optics, extremely unlikely that you could be in any danger. Nonetheless, don't go out of your way to look closely into the lens while the unit is on!
As long as the lens is intact, the beam is highly divergent and at anything beyond a few inches, especially at an oblique angle, is quite safe. The only possibility of risk would be if the lens fell out and you were looking directly into a collimated beam from above. While the power is less than that of most laser pointers, there would be no aversion reflex to the nearly invisible IR. And, yes, some models of CD players are known to drop their lenses!
CAUTION: There is usually a very low intensity (in appearance) emission from an IR laser which appears deep red. It will be visible as a spot the size of the period at the end of this sentence when the lens is viewed from an oblique angle. This is just your eye's response to the near IR energy of the main beam. (Some people apparently cannot see this at all.) Do not be mislead into thinking that the laser is weak as a result of how dim this is. The main beam is up to 10,000 times more intense than it appears! It's power output is generally around 1 mW - comparable to a laser pointer. Take care. However, the red dot is an indication that the laser is being powered and probably functional, though it is no guarantee of the latter. You really need a laser power meter or at least an IR detector to confirm the existence of an IR laser beam.
Whenever a full size (5-1/4") CD is in place, there is absolutely no danger of exposure to the laser beam. Reflections of laser light at these power levels are harmless. However, if you are testing with a 3-1/2" 'single' or homemade cut-down test CD, avoid staring into the lens if there is any chance the laser is powered.
If you don't want to take even the minimal risk of looking into the lens at all, project the beam onto a piece of paper held close to the lens. In a dark room, it should be possible to detect a red spot on the paper when the laser is powered.

I own an old Pioneer PDM-710 multi-cd player since 1980... after many years of honourable service, it stopped working properly. I tolerated a lot of anomalous behaviors (short and long skips, mainly); lately the overall musical quality decreased, and at the end the disks stopped spinning. It was due time for a repairing session...
After spending many hours surfing the Internet, I managed to find a copy of the original service manual for the PDZ-72 model... oh, well, it is not so different! Let's hook up the oscilloscope!
.jpg)
First of all, never miss a chance to look at SAM's Repair FAQ; I annotated here some excerpts related to the Pioneer PDM series, because I followed these notes more than the service manual!
Where a Pioneer player or changer does not recognize discs, the most common causes are:
Partially shorted spindle motor due to 'crud' on commutator. Cleaning may be possible. Generally, disc will spin but at insufficient speed. Try TEST MODE toward latter (outer) part of disc as the required rotation rate is lower and/or check voltage to motor, below.
Checked... and cleaned with a generous squirt of isoprophyl alcohol. The motor started spinning again!!!
CAUTION: be sure the alcohol is COMPLETELY dried inside the motor before powering on!!!
Cracks in flex cable to optical pickup assembly - replacement of flex cable will be required. This may also result in erratic operation while playing. The Pioneer replacement part number for the improved version of one common cable is PNP-1343 but confirm this is correct for your model before you order. Sometimes, the flex cable is just not positioned properly (clear of the metal cover) and just needs to be 'adjusted'.
Checked.
Collapsed rubber suspension grommets. There may be a scraping or clicking sound associated with this failure. For changers, gently lift up on the optical pickup assembly while the disc is attempting to spin to see if the disc is recognized and will play. Replace the deteriorated grommets.
Checked.
Lens fell out. This is somewhat rare and applies mostly to changers (possibly only those made by Pioneer) where the pickup is mounted upside-down, but apparently the adhesive dries out and may fail completely during use or as a result of the player being moved. Note: If you do attempt to reattach the lens, replace the rubber grommets as well as collapsed rubber grommets are common on these pickups as well - and may even have been the cause of the lens problems (disc contacting lens).
Checked.
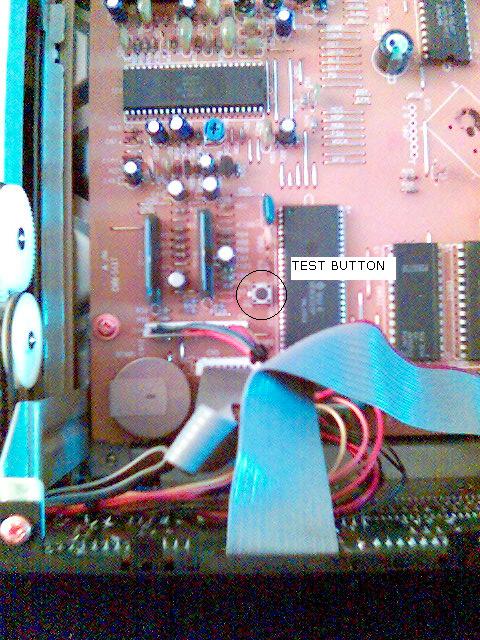
The TEST mode available on some CD players is extremely useful for narrowing down problems. The following are for the Pioneer PD/M series of CD players and changers:
To enter TEST mode, press the TEST button while turning POWER ON and then hold it on for at least 1 second.
Some models only have a set of contacts - Pioneer saved 2 cents on a switch! Short between these with a piece of wire or a paper clip instead of pushing the button.
On players with a standby mode (not a hard on/off switch), plug the unit in while pressing the TEST button or shorting the contacts.
The TEST button or contacts are located on the main board (usually near the front right corner - may be obscured by cables).
Once TEST mode is engaged, the servos can be controlled from the front panel:
STOP turns all servos OFF.
TRACK FWD (>>|) enables FOCUS servo (and loads disc 1 in changer).
PLAY enables SPINDLE servo.
PAUSE enables TRACKING servo.
MANUAL SEARCH FWD (>>) or REV (<<) to move the optical pickup.
Depending on model, the specific functions and behavior of the front panel buttons in TEST mode may vary slightly. Some may use PROGRAM to turn on laser, PLAY to enable focus servo, second push of PLAY to enable tracking servo, etc. You may have to experiment.
WARNING: Normal safety checks are disabled in TEST mode. Thus, the laser may remain on as long as focus/tracking/spindle servos are engaged even if no disc is in place. Take care.
Power cycle (by unplugging if necessary) to return to normal mode.
Here are the typical measurements for the PD/M series players:
Spinup: >2.5 V.
Time to lock (est): 1 to 2 sec.
Start of disc (500 rpm): 1.0 V.
End of disc (200 rpm): 0.5 V.
Checked.
When bad, spindle servo drive tops out at 0.6 V and 100 ma. Player is unable to spin up to required 500 rpm to read disc directory.
While exact cause is unclear, theory is that large voltage applied at startup followed by long periods of very low voltage (.5-2 V) operation allows conductive crud (carbon) to build up on commutator eventually reducing resistance to the point where the driver cannot apply enough voltage to achieve 500 rpm.
A short squirt of degreaser through motor access hole had an immediate dramatic effect returning operation to normal. It is not known how long this will last.
Collateral symptom: Spindle motor servo drive IC becomes quite warm when attempting to power shorted motor. However, it does not appear to be harmed.
Use TEST mode to play disc at outer track. If this is normal, then spindle motor is probably bad as the rotation speed at the outer tracks is less (200 rpm) and a partially shorted motor may still run fast enough for this.
Verified; the servo drive IC was indeed hot. Degreasing the motor restored normal operation:

The following procedure assumes that unit is functional but internal controls may have been moved from their correct position. This procedure has been determined experimentally and is subject to change without notice. If you have not touched the internal controls, there is no need to perform this procedure. Use techniques and observations discussed elsewhere in this document.
A number of Pioneer CD players have used very similar designs. However, technology sometimes the implementation changes dramatically between units with virtually identical model numbers. It is known that this adjustment procedure applies to many older Pioneer single disc players (e.g., PD5100) and magazine changers (e.g., PDM400/500/600 etc,). However, newer models that appear virtually identical to these may require a totally different adjustment procedure. Therefore, use at your own risk! With minor (and obvious) modifications, this general approach should also apply to many CD players from various other manufacturers as well.
Assumptions:
Controls on the main board have been moved or are in an unknown state but not on the flex-cable or optical pickup assembly.
The player is otherwise functional - no physical damage.
And now for the fun:
.jpg)
.jpg)
Set all the main board controls to their midpoint.
Power up the unit in TEST MODE (hold down the TEST button while powering on.
Adjust TR.BAL (Tracking Balance) to the center of the range over which the sled remains stationary. Outside this range, the pickup will slew to one end or the other.
While monitoring TP1-6 (FO.ER, Focus Error) with a VOM or DVM, adjust FO.OFS (Focus Offset) for a reading of 0V +/- 10 MV. Note: I have found that on some players, this may not actually be quite optimal and fine adjustment be beneficial.
While monitoring TP1-2 (TR.ER, Focus Error) with a VOM or DVM, adjust TR.OFS (Tracking Offset) for a reading of 0V +/- 10 MV. Note: I have found that on some players, this may not actually be quite optimal and fine adjustment be beneficial.
Load a magazine with a disc in slot 1 and press >>|, TRACK SEARCH Forward. This should load the disc and enable focus servo.
Use MANUAL SEARCH REV (<<) to position sled at beginning of disc.
Press PLAY. This enables the spindle servo. Disc should now spin up and lock at at around 500 rpm. If disc does not start or appears not to reach correct speed, check voltage on spindle motor. It should be greater than 2.5 volts during spinup. The most common cause of low voltage is a dirty partially shorted commutator/brush assembly inside the motor; clean or replace as necessary. WARNING: if the disc spindle speed runs away, turn power off and wait for spindle to stop completely. VCO control may be set to high; turn counterclockwise 1/4 turn and start from the beginning.
Press PAUSE. This locks the tracking servo. The display should show the disc TRACK and TIME. Alternately pressing >> or << should move pickup, then press PAUSE to start play again. Audio will be correct at output. Correct display and sound only near end of disc indicates a spindle motor unable to achieve sufficient speed (see above).
Adjust the VCO control to the midpoint of range in which disc plays correctly.
Set RF.OFS to the midpoint of the range over which play continues normally.
Set FO.GAIN to midpoint of range over which it locks. CAUTION: the disc may enter a runaway state if you go to far. Check at both the beginning and end of the disc. FO.GAIN may need to be increased if the player is overly sensitive to bumps or disc wobble. It may need to be decreased if sensitivity to disc defects is too high.
Set TR.GAIN to the midpoint of range over which it locks. CAUTION: the disc may enter a runaway state if you go to far. Check at both the beginning and end of the disc. TR.GAIN may need to be increased if the player is overly sensitive to bumps or disc wobble; it may need to be decreased if sensitivity to disc defects is too high.
Press STOP. The disc should unload. Exit TEST MODE by turning power off and on again. Confirm that the disc loads properly and that the directory comes up quickly and the music starts without excessive delay, hunting, or hesitation.
Test forward and reverse search and seek functions for proper behavior. Some slight adjustments to tracking balance or fine tracking offset may be needed to equalize the forward and reverse search or seek speed.
The player should now operate normally. However some tweaking of the gain controls may be necessary (as described above) for optimum defective disc and track seek performance over entire disc.
If you have an oscilloscope capable of at least 5 MHz bandwidth, you can now optimize the amplitude and stability of the 'eye' pattern at the RF testpoint by going back and touching up the various offset (RF, focus, fine tracking) adjustments.
Done!
.jpg)
.jpg)
Unless otherwise instructed by the service manual, it is probably safe to assume that the RF signal should be maximum when everything is properly adjusted. For example, if TR.OFS is not set properly, you may find that the RF signal amplitude *decreases* when the tracking servo is closed since the laser beam is now consistently off-center with respect to the row of pits and lands. (With the servo loop open, the beam was crossing tracks more or less at random so it was sometimes centered!) For the Pioneers I have seen, it appears that the FO.OFS and TR.OFS may *not* be set optimally by the static adjustments (4) and (5), above.
I also checked the most important waveforms as per the Service Manual... and after some adjustments everything was fine!
.jpg)