 |
2007
- LOSNA model "alpha"
Here
after you can find some details about this model, the first "serious"
recumbent 100% designed and produced by us.
|
| Introduction: |
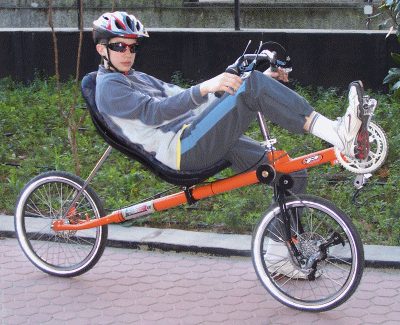
My first
recumbent was a Flevo Racer.
My Flevo Racer is home-build using plans I found in Internet. It took me
around one year to be ready to use this bike (mainly because I have not
so much spare time for building) and many hours to be able to ride it for
some metres.
I'm not a fanatic cyclist, but I love recumbent concept for many of the
usual reasons everyone can read in several web sites.
As an home-builder, I like the thinking and design phases behind the final
result: a ready to be ridden recumbent bike. |
With these
pages I would like to give some general information about the process followed
to design and build this new home-made recumbent .
As I'll repeat
here after, benchmarking is the key of the success: before to think about
a new "toy", it's really important to have a look to other bike
that follow concepts close to what we have in mind; this in order to have
new suggestions, ideas and to avoid big mistakes.
Building a bike
it's not so difficult if you think in advance about what you are going to
do … and it means a lot of fun! |
| What
I'm looking for (requirements): |
| At the
beginning of a new project it's important to write down the main requirements
and only after this step to try to find solution to satisfy them (with as
less compromise as possible). My goals: |
- the bike has
to be fast
- I'm thinking
to use the bike on-road
- I want to be
visible in traffic
- I can't
consider "low" solution "safe" as in my area there
are not so many streets dedicate to bicycling
- easy to find
commercial components
- it means
components used mainly on standard bicycles
- easy to build
- frame with
less parts as possible and without curves
- take in consideration the use of front and rear fork from conventional
bikes
|
- easy to transport
- I just want
to be able to put it easily inside my car; I don't want to consider
foldable bikes
- riding must
be easy to learn and not so much challenging
- the Flevo
Racer experience teaches that only very motivated people can learn to
ride this very unique kind of bent; you need a lot of time (months);
this reduces a lot the possibility to involve sceptical people giving
them the opportunity for an occasional riding test
- in other words: I would like to involve other people to this different
& clever way to pedal
|
| What
solutions I'm going to choose (specifications): |
| Considering
the 1st requirement, a "racer" bent will be the solution,
but in order to be visible in traffic (2nd requirement) it will be
at least a "medium racer" if not an "high racer".
The 3rd requirement
depends a lot from how much it's easy to find special components for bent;
living not so far from a "recumbent guru", this could be not
a big problem; in other words: I could accept to only partially follow
this requirement if the solution I'll prefer needs special components.
Straight, mono-boom
frame seems to be the best choice to respect the 4th requirement;
fortunately there are so many blazoned bents to drawn inspiration from.
In order to improve torsion stiffness, a round section tube will be used
(here after consideration about this topic).
Shock absorber will be not considered due to the consequent complication
in the frame construction, not forgetting weight & cost; even if it's
really simple, the rubber cylinder used on the Flevo Racer is not the
best solution, due to undesired damping effects.
About the material,
even if I'm not able to weld at all, steel seems to be still the best
solution.
|
The 5th
requirement depends a lot from the kind and size of your car.
The FWD (Front Wheel Drive) choice could be helpful as it will be possible
to easily disassemble the rear wheel; FWD is a good choice for weight-saving
and simplicity too.
Even if I'm really
fascinated by the centre steering bent concept with front wheel drive,
to satisfy the 6th requirement I'll follow a more conventional
steering solution.
Having these specifications
in mind, it's almost defined that the new "monster" will be:
- SWB (Short Wheel
Base)
- FWD (Front Wheel
Drive)
- Medium Racer (2
x 20" wheels)
- Straight mono-boom
(circular section)
- Steel frame
- No front and rear
suspension
- Dimensions good
also for a twelve years old kid, like my first son
|
| Benchmarking: |
In
order to define the general dimensions of the new bike, benchmarking trough
the web sites of the "blazoned" commercial (and not) recumbent
is a good starting point.
You can find some useful information inside the general specifications,
but other can be detected printing a picture of the bike and measuring them
(for example steering angle).
For the general dimension, I took in consideration the following example:
- Fig.1 - Bacchetta
(models Aero, Corsa, Giro)
- Fig.2 - CarBent
(model Dual 650)
- Fig.3 - Velokraft
(model VK Highracer)
- Fig.4 - Volae (model
Team)
- Fig.5 - Rans (model
Force 5 XP)
|
Looking
for ideas about various kinds of solutions, I took in consideration many
other examples.
Mainly I looked for ideas about: FWD, handlebar position / adjustment, seat
position / adjustment, ... In these cases, pictures and owner manuals can
be very useful!
I strongly suggest
to have a look at least at these interesting links (but you can find many,
many others surfing in the web):
- Toxy ZR
- ZOX
- XPORT 4
- Dragon Bike CTZ
- Fast FWD
- HHS/1 (download
.pdf manual)
|
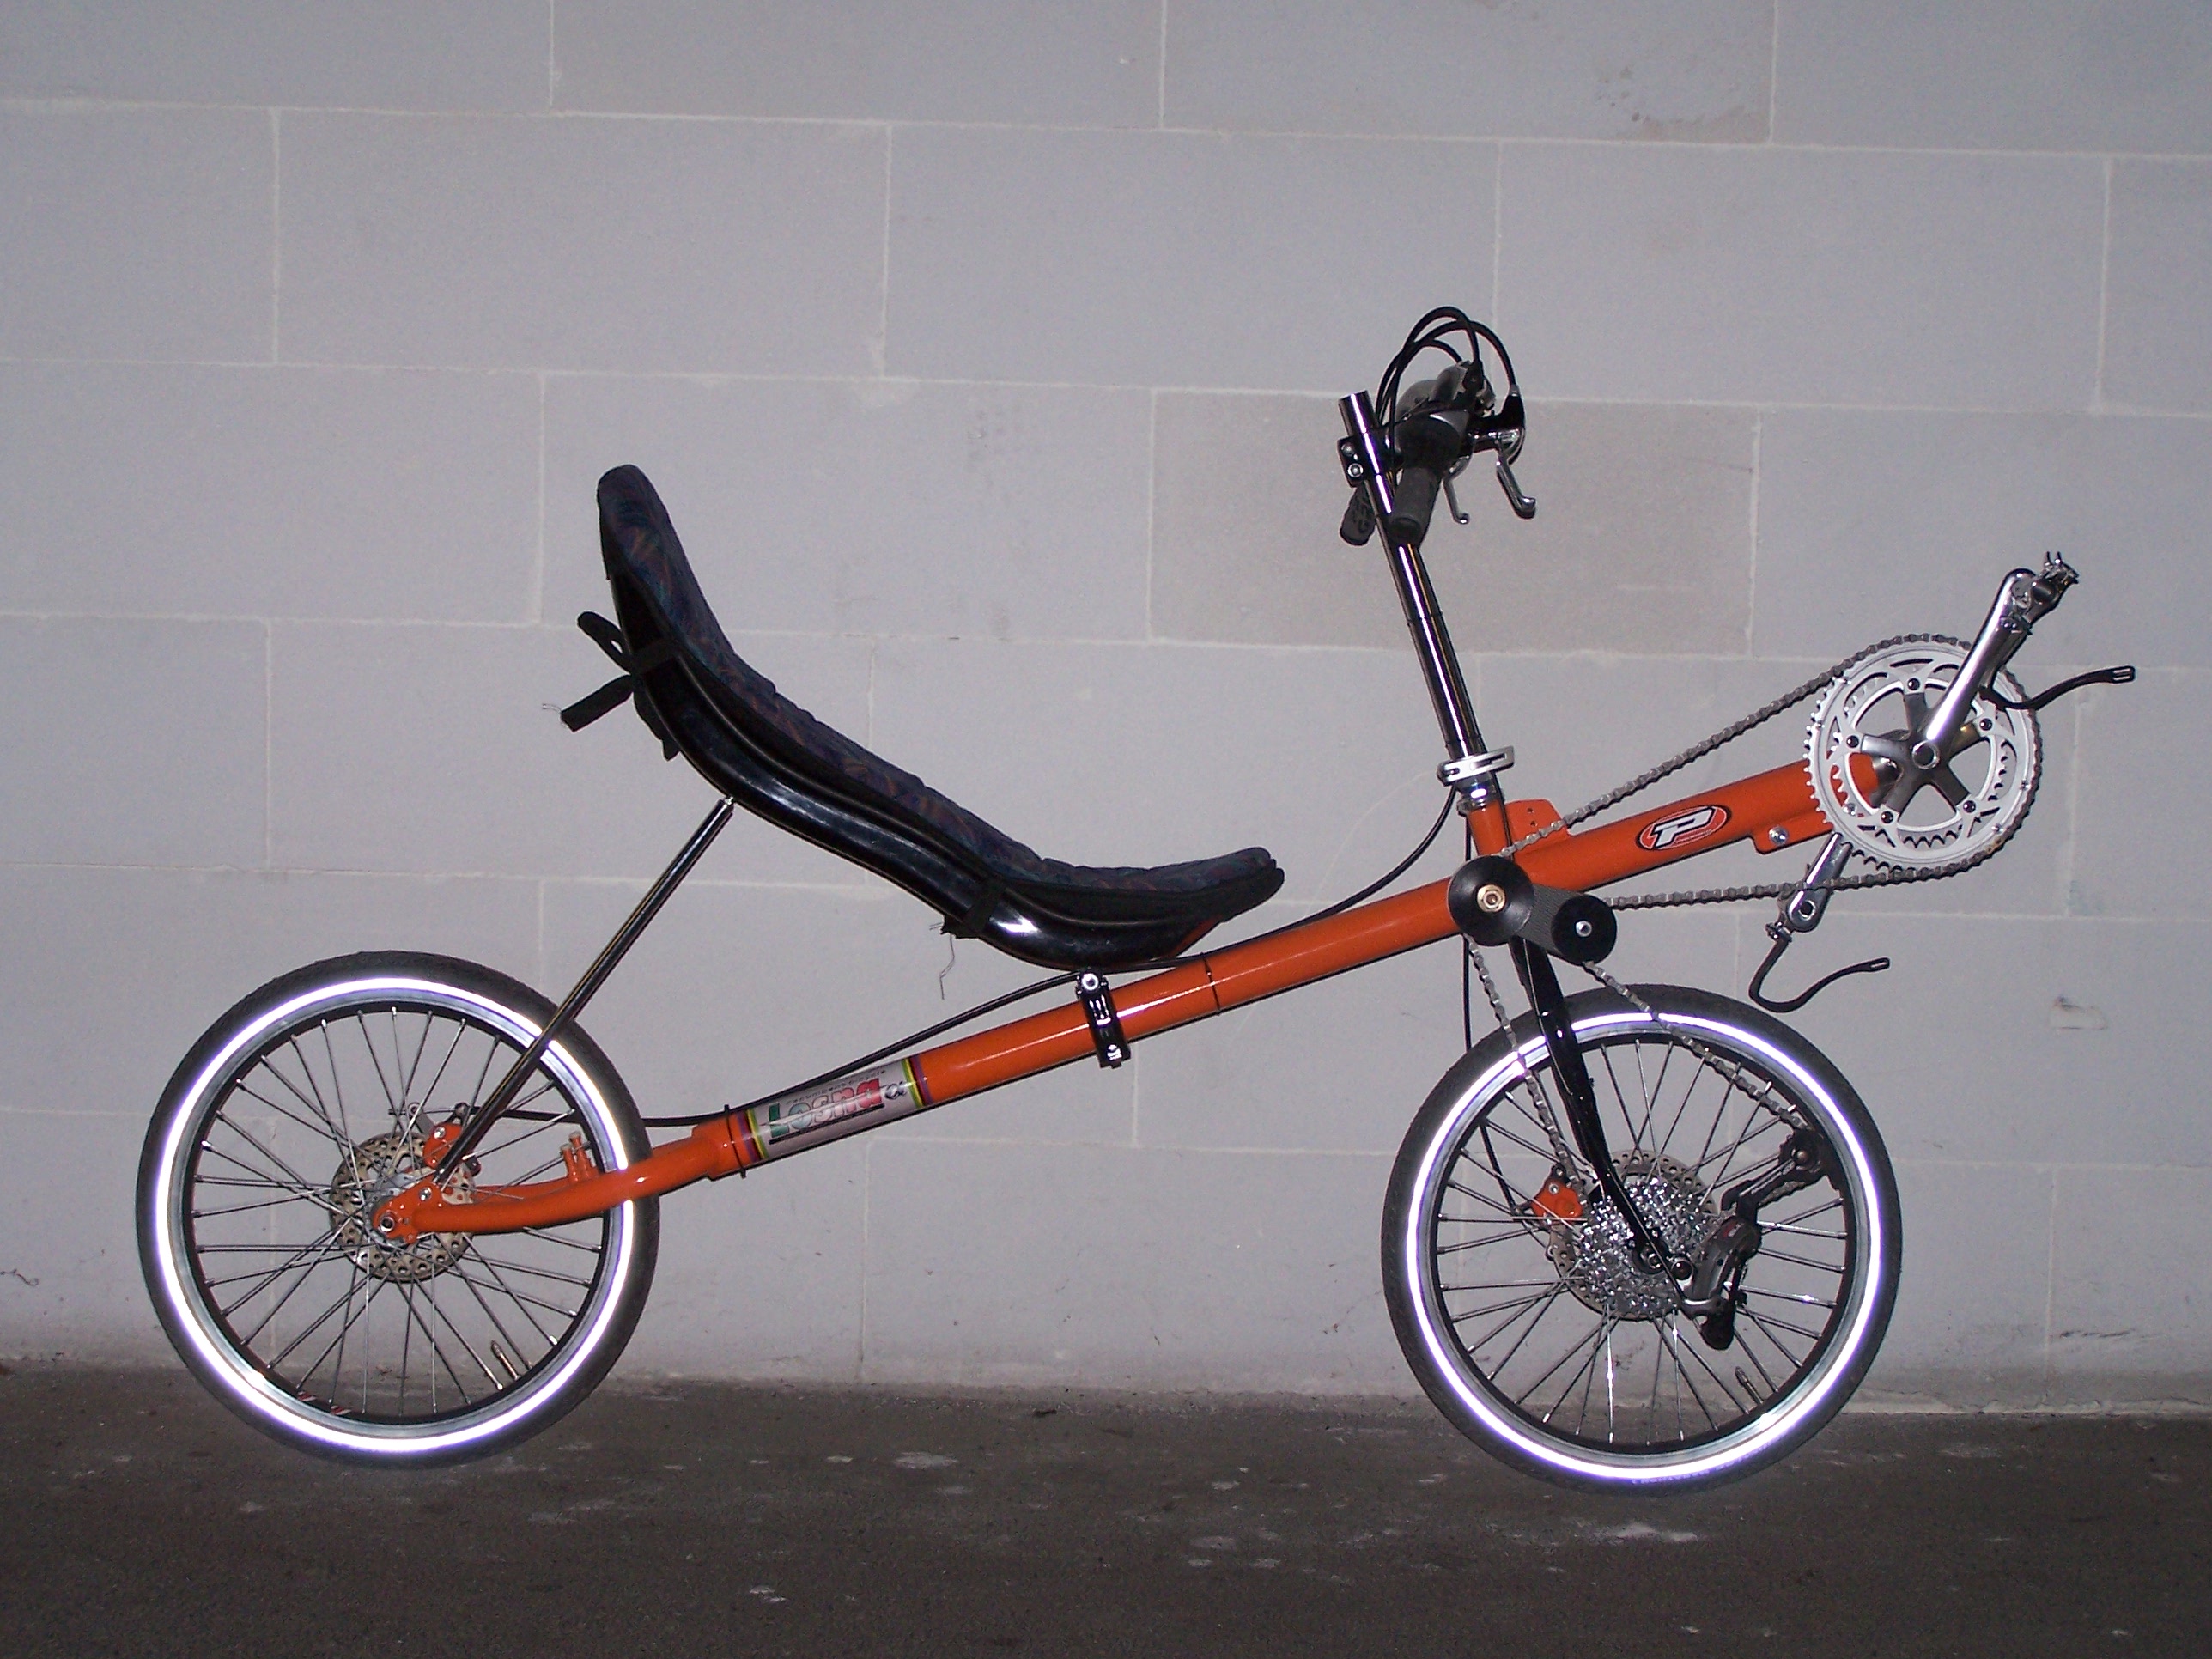
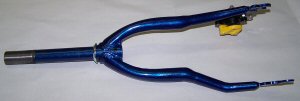
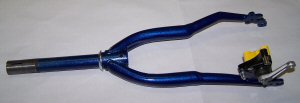
| Geometry: |
| Here after
the general LOSNA dimensions as a combined result of the analysis of several
bents plus consideration related to the component I'm going to use. |
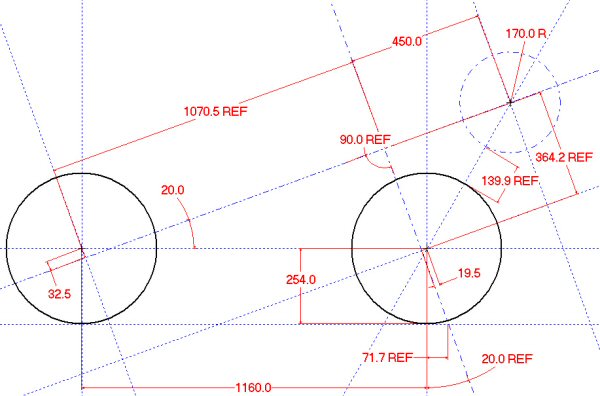 |
The rear
fork is a reinforced BMX front fork (20" wheel) with an off-set of
~32.5 mm.
The front fork
is a special fork designed to accept a 20" wheel with 9 gears, exactly
the same of the Dragon Bike CTZ .
For a simple frame
construction, the headset is perpendicular to the mono-boom main frame. |
The pivot
angle (20 deg) is the result of some geometric constrains due to the mono-boom
diameter (50 mm), the headset and the rear & front fork dimensions.
The adjustable
bottom bracket position comes from my experience on a FWD kid-recumbent.
Finally, the feed-back
from the benchmarking gives the necessary confidence about these choices. |
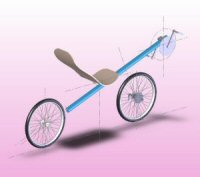
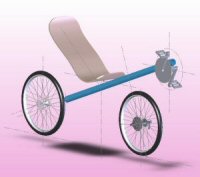
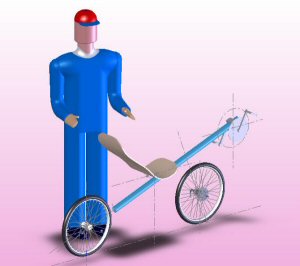
| In order
to have a general overview of the new recumbent I did some simple 3D CAD
sketch without the claim to reproduce everything. Here after some views |
|
|
 |
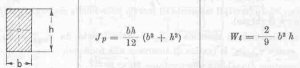
| Mono-boom
section choice: |
If you
look at the different solution of the commercial bents using a mono-boom
frame, you'll find different approaches. My choice to use a round tube with
o.d. = 50 [mm] and wall thickness of 1.5 [mm] is due to the following comparison
vs. a 40x40x1.5 [mm] square tube (40x40x1.5 [mm] square tube is the same
used in the Flevoracer frame as in many other bents: the first version of
the very famous RANS Rocket used this kind of tube too, the ZOX bent range
is based on square section tube frames).
Of course a square section helps a lot in the alignment phases, but, if
with the same weight it's possible to reach higher stiffness, may be this
is something to take in consideration in order to have an easy and safe
to ride bent, isn't it? Some
formulas for the bending and some for the torsion: |
 |
 |
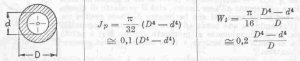 |
| Here after
the results of the comparison round section vs. square section: |
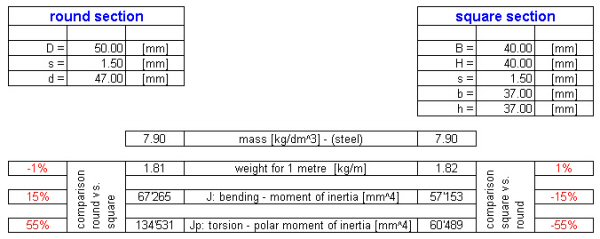 |
|
As you can see from
the data on the left, the round section has:
- almost the same
weight (a little bit lighter): -1%
- an higher bending
stiffness: + 15%
- a very considerable
higher torsion stiffness: +55%
(Obvious) conclusion:
round section is better than square.
|
| Construction
Details |
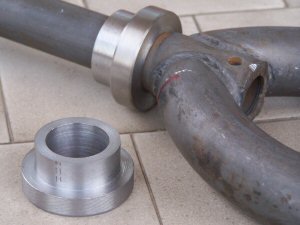
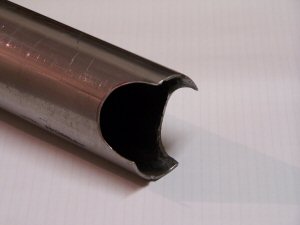
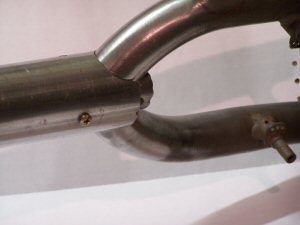
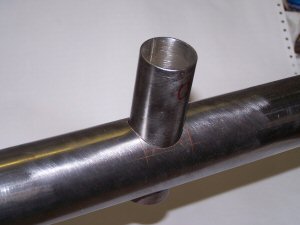
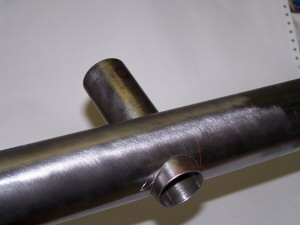
| Rear
fork: |
As written
above this component is a reinforced BMX front fork with a dedicated plate
welded as disk-brake attach.
In order to align and secure it to the mono-boom main frame, I follow the
solutions showed by the pictures on the right:
- two "bushes"
(machined with a lathe) are welded (just three stitches each side of
both bush) to the original headset tube of the fork
- the inner diameter
of each bush is slightly smaller then the outer diameter of the headset
tube in order to have a sort of shrink-connection and a precise fitting;
~0.02÷0.05 [mm] are more than enough; heating the bush on a camping-gas
enable to insert it very easily, then you have to keep it in position
till the temperature will go down (be careful, use thick gloves!)
- the outer diameter
of the bushes is machined in order to fit the inner diameter of the
mono-boom tube
- the bushes total
length is ~20 [mm] in order to avoid stress concentrations on the headset
tube of the fork
- in order to reduce
the weight (some grams!), the bushes are machined keeping ~10 [mm] for
the centring between the bush itself and the inner diameter of the mono-boom
tube
- the rear tip of
the mono-boom tube is then shaped with a Dremel to fit with the fork
- after this fitting,
it will possible to define the precise position of the 10 [mm] centring
band of both bushes where to drill three 5 [mm] holes [*] at 120°
around the outer diameter
- [*] in order to
keep the fork in position for welding, one hole for each bush can be
treated M5 (different hole!) ; two screws will complete the job
- these 3 + 3 holes
will permit "welding spots" to fix the bushes to the mono-boom
tube (here after detailed pictures of the welded frame)
- then the rear fork
will definitely fixed with a continuos welding around the two arms of
the fork
|

|
 |
 |
 |
 |
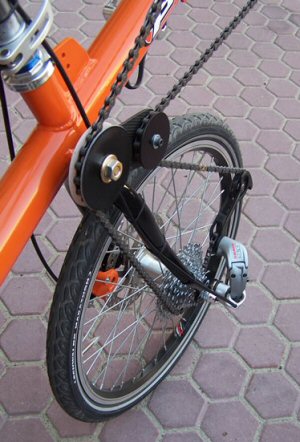
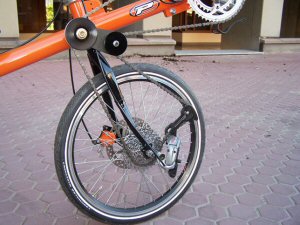
| Front
fork: |
|
This is a special
fork designed to accept a 20" wheel with 9 gears. I decided to use
a disk-brake for the front wheel too; this is not the best solution to
reduce weight, I know, but disk-brakes are really cool and my children
love them ...
|
 |
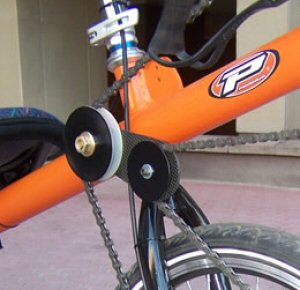
| Headset: |
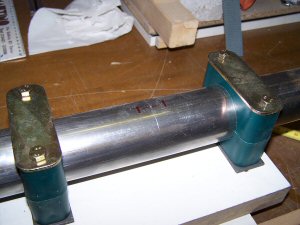
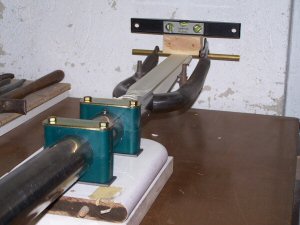
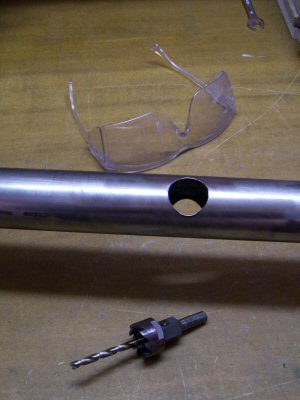
| In order
to drill an hole perpendicular to the mono-boom main frame and to keep everything
in position during the drilling operation, I find "pipe-clamps"
very useful. I used a level temporary fixed to the rear fork to define the
right mono-boom orientation. Now a column-drill is the best tool to finish
the job! |
|
|
 |
 |
 |
 |
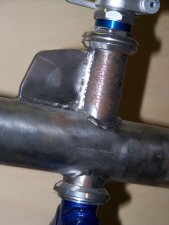 |
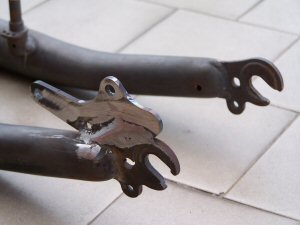
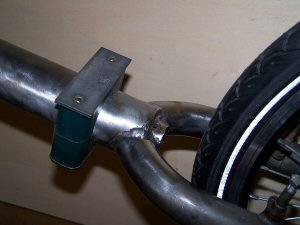
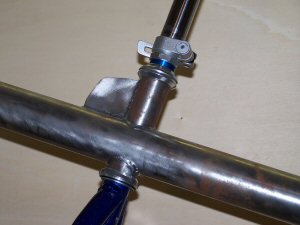
| Adjustable
bottom bracket: |
The choice
to use an adjustable bottom bracket is due to the necessity to have a bicycle
that "will groove" with the owner and/or that will adapt different
owner's sizes. Varying together the seat position, an adjustable bottom
bracket could be useful to test different riding posture too. Of course,
after these tests, for the second LOSNA bike, it could be possible to define
a specific frame size and use only the seat position for fine adjustments.
This solution will save considerable weight.
As it's possible to see from the pictures, the clamping solution is quite
simple and standard: two screws with bolts trough two small metal plates
welded on the left and right of a cut done on the tip of the mono-boom frame.
Here, as on all the other parts of the bike, I prefer to use self locking
nuts.
If more than one gear is used, on the bottom bracket support it will be
necessary to weld an additional tube to support the front shifter.
For the moment, I decided to use only one front gear together with the nine
gears on the wheel. This solution gives an acceptable range of gears (here
after more about this topics). May be in the future I'll take in consideration
the possibility to add another front gear. |
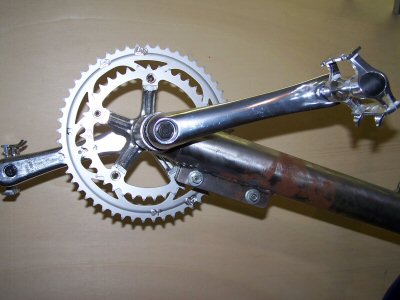 |
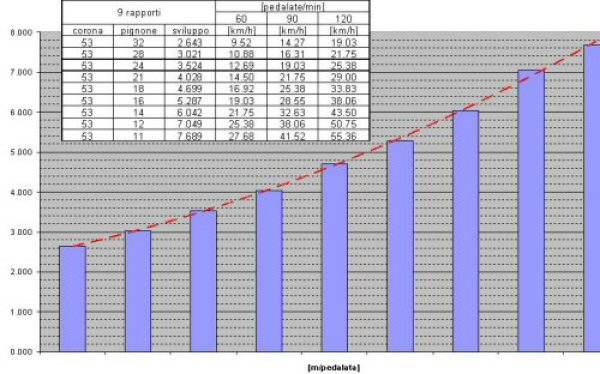
| Gear
ratio: |
As written
above, for the moment I decided to use only one front gear.
Even if I have "on the shelf" a special 76 teeth gear, I'll start
with a more standard 53 teeth that give a good compromise between speed
and climbing. |
 |
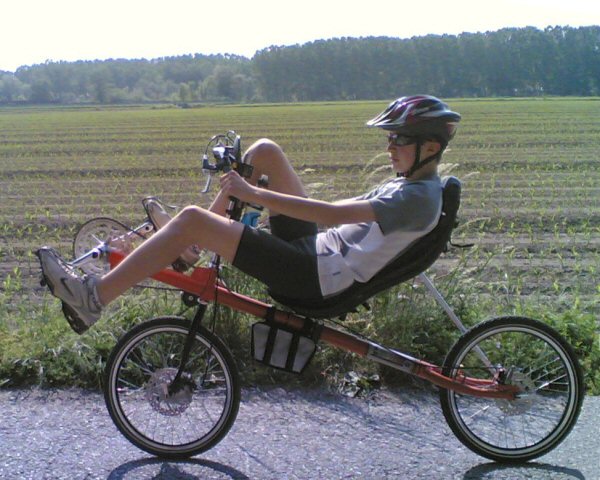
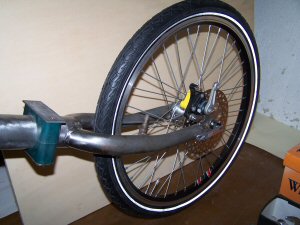
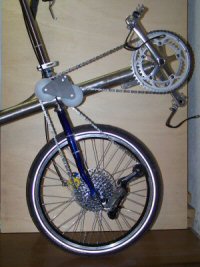
| Front
Wheel Drive System: |
As defined
in the "specification", this bicycle is a FWD recumbent.
There are advantages and disadvantages related to this choice, but, at least
for me, the firsts are enough "strong" to accept the few "bad
points" (all my recumbent bicycle are front wheel driven … ): |
|
Advantages:
- chain is shorter
than standard rear driven systems ' lighter and cheaper (anyway at least
2 std. chain are needed)
- no undesired effects
due to forces coming from chain tension along the bike frame
- rear wheel can
be easily disassembled giving transport advantage (reducing length)
- lay-out design
is easier as it's not necessary to take in consideration the chain path
from the bottom bracket to the rear wheel
|
Disadvantages:
- a special front
fork is necessary (but a std. front fork can be used for the rear wheel)
- steering angle
is a little bit limited (you could feel this limitation only at low
speed)
|
|
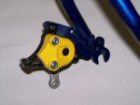
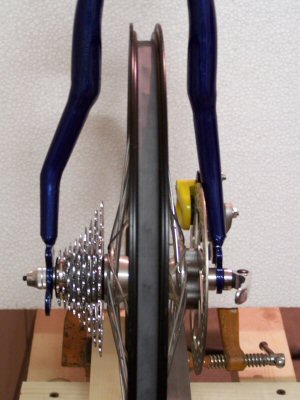
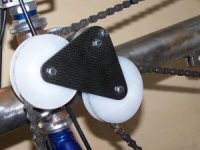
Here after some pictures
that show the solution used on LOSNA. As you can see two pulley are necessary.
The position of the rear one is a little bit critical in order to reduce
at the minimum the limitation of the steering angle; the best position
depends on the number and size of gears and on the shape and geometry
of the front fork; generally speaking, the best position is the one that
keep the chain as close as possible to the steering axle, but the chain
must not hit the front fork arm. Some practical lay-out test moving the
chain on all the gears will permit to easily define the rear pulley position.
Usually the rear pulley has a bigger diameter than the front one, but
the front pulley can have the same "big" diameter. Once defined
the rear pulley position, the position of the front pulley will be easily
found: as close as possible to the rear pulley, a little bit lower to
avoid interference and with space enough to enable to mount the chain.
|
|
The first test were
done with a preliminary version of pulleys; this to check if they worked
properly.
|
|
|
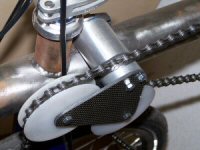
Then I decided to
move to a solution based on a M10 bolt welded trough the mono-boom for
the main pulley (as close as possible to the steering axle), plus a carbon
fiber support plate for the second pulley (same item used on the shifter).
|
|
| |
|
| |
|