The Disappearance of Jebediah Gallidox
by Andrea Ciceri
Note: This Dungeon is presented with the BECMI Ruleset in mind, however it would be easy to swap the monsters and the traps with something equivalent, using those present in other systems.
In the summer of the year 1000 AC some young halflings prospectors found a promising place for a mine just north of the Longflask settlement in Highshire, near the Darokin border. The excavations started promptly under the auspices of Sheriff Graybeard. But they had to stop after less than three weeks because of an unexpected event: a large door of unidentified rock material, similar to dark granite, was encountered. On the door frame there were several runes of dwarven origin. Engraved in the centre of the door was the iron shield of Loktal Ironshield. The excavators had discovered a ruin almost 2000 years old.
The news soon spread all around the Shires: numerous groups of young hin were ready to enter the ruins and become rich and famous thanks to ancient dwarven gold. Sheriff Graybeard, however, did not share the same enthusiasm: despite treasures and gems being tempting, he was rather worried about what, other than gold, could be inside; so, after discussing it with the other sheriffs, Graybeard called Jebediah Gallidox, brother of the more renowned Joshuan Gallidox, to Longflask. Jebediah is a halfling famous for his vast historical knowledge and passion for archeology. However, after a week of studies and research, the hin savant had not come to any definitive conclusion: certainly this ruin could be one of the infinite mining complexes that Loktal planned during his reign. But then why was this entrance was so monumental? And why, moreover, did it have no visible lock or handle. It seemed that the complex had been built to protect something, or perhaps to hold something inside.
Jebediah did not have an opportunity to think more about it, because the next night he disappeared. No trace was found of him. And the morning after his disappearance the door was found open, the right kneader slightly moved inwards. From the opening a thin fog, that moves slowly along ground level, constantly extends. Most adventurous groups were afraid and refused to enter, apart from one who came in last week and has not yet left.
The Sheriffs have heard of the disappearance of Gallidox, and have posted some “missing person” notices, offering 20 gp for information on Gallidox’ whereabouts, or 100 gp for returning him safe. Such notices are posted outside inns and taverns across the Five Shires, and in particular in and near Longflask.
Also, the disappearance is a major news event in Longflask, and just about everyone is talking about it.
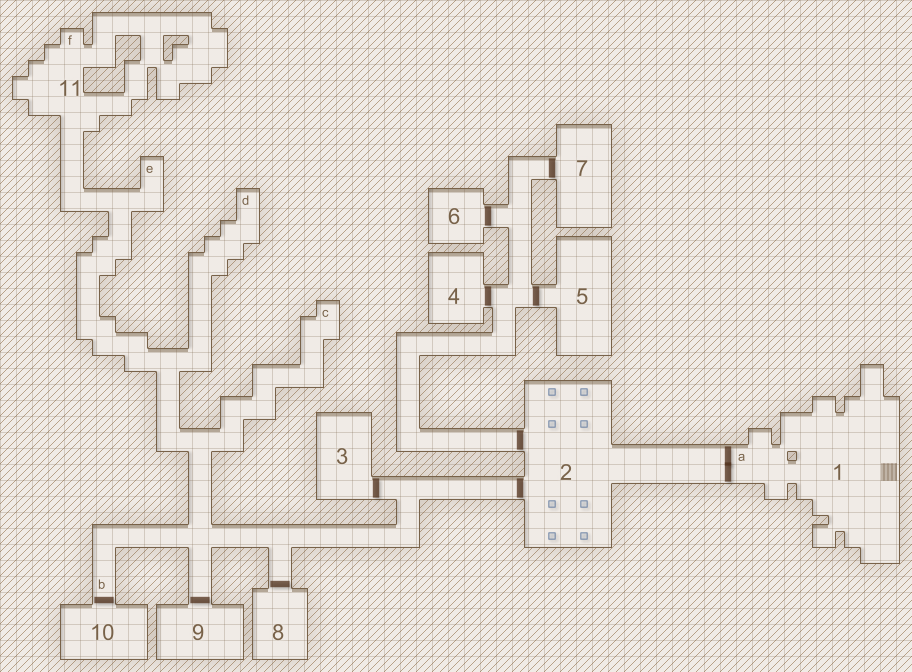
This room is the excavation site proper, which is sunk into the ground 6 meters (19.5 feet). The ground is covered by a thin fog, which covers the feet of the characters. A freezing breeze blows from inside the dungeon. Scattered around there are plenty of work tools: picks, vans, buckets.
This is the door described in the background: a large door of unidentified rock material similar to dark granite. On the the door frame there are several runes of dwarven origin, engraved in the center of the door is the iron shield of Loktal Ironshield.
If any of the PC can read the dwarvish they can recognize the rune “Rast” (“Mountain”) and “Hrokar” (“dangerous”). “The Dangerous Mountain”. The other runes are unreadable due to weather and time.
The door is open and the PC can enter anytime. On the other side there is a corridor totally unlit; if they have a source of light of any type they can spot (1 on a D6) a corpse sitting with his back leaning against the door. It’s a dwarf, dressed in black, with a dark coat covering the body and head. His face is white, totally deformed by an expression of terror. It seems he was backed up in that position.
This great room is a grand vestibule supported by eight richly decorated square columns. The room seems to have been built for vanity and to showcase all the power and wealth of Loktal: several bas-reliefs, engraved with mastery, show several scenes of the conquest of the Five Shires by the dwarves and their battles with the ruthless orcish clans. On the west side of the room, two stone doors are semi-open allowing a view to the corridors on the other side.
Monsters encounter: 6 Skeletons1.
These skeletons belonged to the bodies of some dwarven guards, most of them still have beards, which are attached to the skin that is now mummified and leather-like. They also wear chain armor, which is now ruined by time, apart from the excellent shields that are still in good condition (I suggest to improve the armor class by one point respect the value suggested on the RC). They're also armed with battle axes.
This room had to have some kind of religious function. Much of the space is occupied by what seems to be the remains of a good number of wooden benches. The north wall is entirely occupied by a very elaborate bas-relief that represents a great dwarf who works with anvil and hammer on those who seem to be “little” dwarves2.
Special encounter: In front of the north wall there is a pedestal placed on a small step. On the pedestal there is a basin that is half full of water. The water seems to have silver and copper reflections. It was blessed years ago by a dwarf cleric and still possesses magical properties. In fact, it can be used in two ways:
If the PC search the room carefully they can find (with a 1 on a D6, 1-2 if an Elf character is present) a bag. Inside there are four (4) flasks filled with some silvery magical components. If the flasks are filled with the water of the basin they become flasks of Holy Water. The water inside the basin runs out if all 4 flasks are filled.
Alternatively, characters can drink directly from the basin and get the same effects as the spell “Bless” for 1 hour (RC p. 35 or equivalent from your ruleset of choice). The water inside the basin runs out after 4 characters have drunk from it.
This room was once had a kitchen. There are the remains of several stone ovens, counters, a pantry and even what seems to be an icehouse for food storage. Scattered around the room there are old kitchen utensils and cutlery, mostly ruined and rusty.
Apart from the notes above this room is empty.
This room was once the refectory. A large stone table with stone benches is located in the center of the room, dominated above by large wrought-iron chandeliers. However, the south-east corner has some special features:
Special encounter: The area seems to have been cleared to get space. A semi-circular area was delimited using candles that are still lit. This is the only lit area of the dungeon. At the center of this semicircular area there are wooden crates, probably brought here by the excavating team; maybe dragged into the dungeon from the previous group of halfling adventurers? On top of these crates there is a small statue illuminated by five candles placed around it. The statue is 40 centimeters (16 inch.) high, made of a crystalline material of a bright red color. The statue represents a scaly, massively muscled humanoid with four limbs that end in claws. It also has two little wings protruding from its shoulders and small horns on its head which fold over its ears. The humanoid depicted has its hands outstretched, as if to support an object that is missing.
This is a cursed item: once the object is touched (even briefly) the individual must overcome a Saving Throw against Spells every hour, with increasing penalties (the first time with no penalty, then with cumulative -1 penalty to subsequent saves against the curse for each hour). As long as the character makes the saving throw the object seems to provide incredible benefits: fighters, dwarves, rogues and halflings gain a +1 bonus to hit and damage, while magic-users, clerics and elves can cast spells as if they were of one level higher. But once they fail a saving throw they become victims of a magical effect like the Confusion spell but with an undetermined duration. Every round roll on the following table for a confused character. The curse can be removed by a remove curse spell, but takes hold as soon as the statue is touched, and remains effective even if the victim loses possession of the statue before the negative effects become apparent. The beneficial effects, on the other hand, disappear as soon as the item is not anymore in the character’s possession.
This room was once a warehouse or storage room. Aligned along the walls there are several containers: rock compartments with hardwood veneered doors. Most of these are destroyed and ruined by time. After a careful search the characters will notice that everything that could be of value in the room was taken away long ago. As a result, the place is to be considered empty.
This room, once, had to be the dormitory. There are remains of stone beds, on which are mounted wooden structures that form a bed above, creating bunk beds. Mattresses and pillows are completely ruined and fill the room with an intense smell of mold. There are trunks at the foot of the beds, but most have been picked, torn open or ruined by mold. Their contents varies from clothes to blankets (obviously moldy, ruined and eaten by moths).
Trap encounter: However, not all boxes are useless. One is still intact: a large dark wooden box with brilliant bronze finishes that looks strangely immune to the ravages of time. This trunk is closed and the lock has to be picked in order to access its contents. It is also protected by a trap: anyone who tries to open it without first removing the trap becomes the target of hidden blades that spring out by means of a spring mechanism from the box, causing 2d4 damage (ST on Death Ray for half damage). Inside the trunk there are 1100 sp.
The door to this room is already open, a careful look (especially by a thief) will show that the lock has been tampered with by skilled hands. The room contains a large chest, open and empty. Six corpses lay on the stone floor. Two are human sized, the remaining four were once halflings. The corpses look decayed, and a veneer of mold covers them. If the bodies are disturbed, they raise as zombies to attack the intruders.
There is no treasure in this room. Whatever was the contents of the chest, it has been looted. How this could have happened without triggering an attack by the monsters is hard to say. Maybe the looter was an undead, or a cleric able to turn or control the zombies.
The zombies themselves were adventurers, and died when their thief failed to identify a trap in the chest lock. A thief PC can infer this information by inspecting the lock, and passing a Find Traps check at +50%.
Monsters encounter: 6 zombies3. Four zombies are halfling sized (reduce damage to 1d6 and HD to 2-2), the remaining two are human sized (their trappings identify them as a thief and a magic user). All the zombies are covered by a dangerous mold. If someone is hit by a zombie, they have to save vs Poison to avoid contracting a strong fever, which will incubate until the next rest. From that point on, the character will be at -2 to attack rolls and saving throws due to fever, until he passes a Constitution check, which can only be made after each daily rest.
This room was a storage area for the mine. Some tools (picks, shovels, lanterns, mining carts) and debris from the excavation are littered on the floor, but nothing is of actual value.
The access to room 10 has been protected by the dwarves with a trap.
Trap encounter: A trigger in the door lock causes blades to spring down from the ceiling, causing 1d8 damage to all people standing in front of the door, unless a ST vs. Paralysis is made.
This room was a secure storage area for valuables and treasure, much like room 8. However, contrary to room 8 this area has not been looted. The dwarves left items here that were too difficult to move when they left. They had an intention of coming back later and pick the goods up, but they never did. Two large locked chests contain each 3000 cp and 2000 sp. Moreover, 10 suits of plate mail are stored here, together with 10 shields and assorted weaponry (4 long swords, 2 battle axes, 2 maces and 2 warhammers), neatly arranged on racks and wrapped in oiled cloth, now dried. The weapons and armor date back to the times of the Glittering Realm, although only a dwarf with appropriate knowledge of history or metallurgy can identify it as such. All the items are dwarf-sized.
Monster encounter: a choker hides in this area. The monster has entered the cave recently, looking for food -- now it has found some, the PCs.
The area is an abandoned mining tunnel. There is a silver vein here. It is possible to mine 10,000 sp worth of ore, although it would take many weeks to do so.
A dead dwarf is crumpled in this corner. He wears dark clothes, and has an expression of hideous terror on his face. This dwarf is an agent of the Broken Shield, a dwarven secret society discussed in The Truth Behind It All, at the end of the adventure.
This cave is irregularly shaped, as it was part of the mining activities of the dwarves. It was clearly not fully consolidated. Actually, a dwarf or other mining expert can discover that in area “f” a controlled collapse was instigated by expert miners, to block the tunnel.
On the east side of the room, the corpses of two more darkly dressed dwarves and the statue of a halfling can be seen. Both dwarves are recently dead, and the statue looks remarkably like Jebediah Gallidox -- it is actually the halfling sage, petrified by a spell.
Jebediah’s haversack lies near the statue. It contains a good looking pipe. This is a magical object. When the pipe is lit, the smoker can, by pronouncing the magic command (“animate” in Lalor), animate a single small tool (e.g., a pen or needle)4. The item remains active for one turn, and cannot perform more than repetitive tasks which the user would be able to do himself.
On the wall near the statue, a map has been drawn with chalk (this task was performed surreptitiously by Jebediah, using the pipe). The map shows the entrance of Loktal’s Vault near Myskmyr Falls. Elder halflings or sages may know that once there was a dwarven city there, but the area is now infested with greenskins (orcs) who seek the ore that abounds in the area.
On the south-eastern wall, there is a niche. The dwarven thane of this outpost was buried here with the original map. Unfortunately, the darkly dressed dwarves stole the map, activating a curse which caused all the dead in the dungeon to rise as skeletons and zombies.
Monster encounter: 5 skeletons5 are found here, and attack the PCs as soon as they enter. 4 of them are normal skeletons, but the Thane is a special monster.
Loktal Ironshield had established the dungeon as a mining outpost and a dwarven clan hold -- he had thanes to please with land and benefits. The works initially went well, and the dwarves found some ore veins. However, the dwarves dug too deep (as they always do, according to the halflings). They found a Deep Glaurant outpost, or perhaps even an access to the fabled Glaurant city. A Great Glaurant was also present. The dwarves prevailed in battle, felling the Deep Glaurants, but not the Great one, who was instead put in stasis by one of the dwarven clerics. The Thane, however, had died, and the cleric could not ensure that the Great Glaurant would remain blocked. So, they decided to withdraw from the outpost, strategically caving in tunnels and locking it all down so the Glaurants could not use it to invade the surface. They carried with them most of the valuables, but buried their Thane.
Following Loktal Ironshield’s defeat, some of his surviving relatives and loyal henchmen made it back to Rockhome. There, they formed a secret cabal, the Broken Shield, with the goal of restoring the glory of Loktal’s clan. They are aware that Loktal had made a major, upsetting discovering while he was king of the Glittering Realm in the modern Five Shires. They know this discovery was hidden under his stronghold, in a place they call Loktal’s Vault, but ignore the fact that the secret was really a Blackmoorian outpost. Furthermore, they do not have a precise idea of where Loktal’s Vault is located. They have spies across the Five Shires, though, and these spies sent them news of the discovery in Longflask. From the maps and journals dating back to the times of the Glittering Realm, they knew Longflask’s outpost was commanded by a Thane, one of Loktal’s most trusted lieutenants. Perhaps the Thane knew about the Vault, and may have left some clue to its location. So, the Broken Shield sent a contingent to Longflask. The Broken Shield envoys had the right key and knowledge to open the way that had baffled Gallidox, but they were spotted by the halfling. So, they followed him back home and kidnapped him. Meanwhile, a group of adventurers got to the site, and entered before the dwarves. The Broken Shield agents were not disturbed: they knew the dungeon would be trapped, and actually preferred to have the adventurers take the risks. As they thought, the adventurers soon died, while the dwarves made it to the Thane’s tomb, and saw the paralyzed Great Glaurant. They did not know what to do with it, but searched the tomb and found the map. Jebediah, meanwhile, used his magical pipe to create a duplicate of the map, hoping to leave it as a clue to any rescue party. However, the tomb’s curse activated, and all the dead in the dungeon arose. The magical fluctuation also broke the weak spell that was containing the Glaurant, who petrified Jebediah. The dwarves fled with the map, although some of them died of heart failure in terror.
|
D20 Roll |
Behavior |
|
1–2 |
Attacks one of his allies (chosen randomly) with a melee weapon or if the target can’t be attacked he moves towards the target to attack it |
|
3–4 |
Touch another with the statue |
|
5–10 |
Does nothing apart blather incoherently |
|
11–14 |
Run away at maximum speed
|
|
15–20 |
Attacks the closest creature (chosen randomly) |
1Rules Cyclopedia, p. 204, or the equivalent of your ruleset of choice
2This is a representation of Denwarf creating the first dwarves
3Rules Cyclopedia, p. 213.
4As per the Animate Tool cantrip from Basic Fantasy RPG http://basicfantasy.org/downloads/BF-0-Level-Spells-Supplement-r1.pdf
5Rules Cyclopedia, p. 204.