- Intro to Anvil A brief overview of Anvil Studio, the screens we will be using, and how to enter notes.
- Melody (Lead) Here, we will start by entering a familiar melody. Later we will build on it by adding other instruments.
- Drums We will add a drum beat to our melody
- Bass We will add bass to our song
- Chords (Rhythm)We will add chords to our song
- Finishing We will add some finishing touches to our song.
Variations: Here we will look ways to add variety to our creation using a minor scale, key changes and embellishments.
* Introduzione alla Anvil : Una breve panoramica della Anvil Studio, gli schermi che useremo, e come inserire le note.
* Melodia (principale): Qui inizieremo inserendo una melodia familiare. Più tardi costruiremo su di essa con l'aggiunta di altri strumenti.
* Batteria : aggiungeremo un ritmo di batteria alla nostra melodia
* Basso : aggiungeremo un basso alla nostra canzone
* Accordi (ritmica) : aggiungeremo accordi alla la nostra canzone
* Finitura : aggiungeremo alcuni ritocchi alla nostra canzone.
Varianti: qui cercheremo il modo di aggiungere varietà alla nostra creazione utilizzando una scala minore, cambiamenti e abbellimenti.
This tutorial is based around a very simple melody. The idea here is to learn some basics before going on to create your own compositions. By keeping the melody simple, it is easier to see how and why things go together as they do. As we proceed, there are some sample sound clips. All of these can be downloaded and saved by right-clicking on the play-bar.
Through out this tutorial, there will be times when some additional information on topics may be helpful, but not crucial. In these cases, there will be keyword link to explore a topic in more depth.
Ok, let the music begin..............
Attraverso questo tutorial, ci saranno momenti in cui alcune informazioni aggiuntive su argomenti possono essere utili, ma non cruciali. In questi casi, ci saranno collegamenti "a parola chiave" per esplorare un argomento in modo più approfondito.
Ok, che la musica cominci ..............
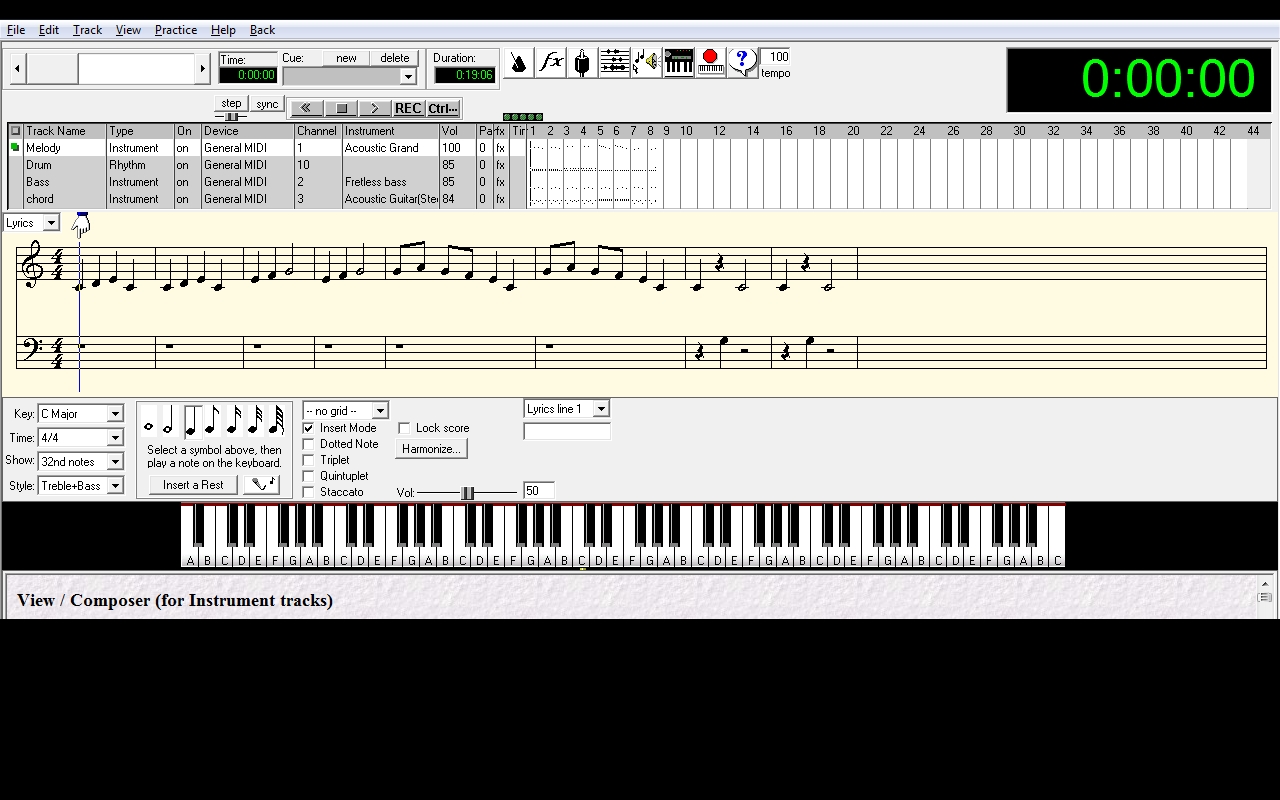
Before we start composing, we need to become familiar with Anvil Studio. For starters, Anvil Studio is primarily a midi sequencer. Midi files are very compact, and are instrumental....that is, they contain no vocals. Anvil Studio does have some ability to work with a microphone, (wave files) but this is very limited in the free version. In this tutorial, we will use the free version, so we will work strictly with midi files.
Prima di iniziare a comporre, abbiamo bisogno di acquisire familiarità con Anvil Studio. Per i principianti, Anvil Studio è principalmente un sequencer MIDI. I file Midi sono molto compatti, sono strumentali .... cioè non contengono parti vocali. Anvil Studio ha alcune capacità di lavorare con un microfono, (file wave), ma questo è molto limitato nella versione gratuita. In questo tutorial, utilizzeremo la versione gratuita, per cui lavoreremo strettamente con i file midi.
Let's go ahead and fire up Anvil Studio. The program has a lot of other features, but only two screens that we will be concerned with:
- Mixer: Shows all tracks. Playback, name and adjust track properties, cut and paste.
- Composer: Compose each track note by note.
Remember: Under each active screen in Anvil Studio, there are instructions on it's operation and features. You can also access this from the Help menu.
The program opens on the Mixer, so lets look at that first.
* Mixer: Mostra tutte le tracce. La riproduzione, il nome e regolazione delle le proprietà della traccia, tagliare e incollare.
* Compositore: Componi ogni traccia nota per nota.
Ricorda: In ogni schermata attiva in Anvil Studio, ci sono le istruzioni sul suo funzionamento e le caratteristiche. È inoltre possibile accedere a questo dal menu Help.
Il programma si apre sul mixer, quindi vediamo questo per primo.
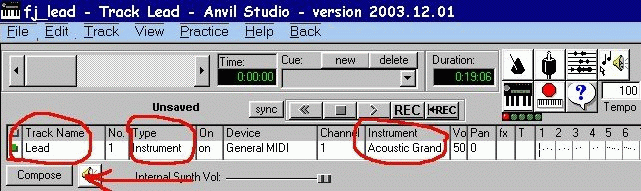
Mixer View
The Mixer screen gives us an overview of our entire composition. It is common for songs to have more than one instrument playing, and each of these instruments is assigned a track. The Mixer shows all the tracks, and from this window, we can adjust the track properties. *Working with Anvil Studio is all about creating and mixing tracks. *
Anvil Studio has 3 types of track:
- Audio (which we won't be using)
- Instrument (melody, chords, etc)
- Rhythm (drums)
The screenshot below shows four tracks. From this window, we can assign a name to our track, select an instrument, control volume and pan, adjust tempo, and cut and paste parts of our song.
Lo schermo Mixer ci fornisce una panoramica della nostra intera composizione. E 'comune per le canzoni avere più di uno strumento, e a ciascuno di questi strumenti è assegnato una traccia. Il Mixer mostra tutte le tracce, e da questa finestra, possiamo regolare le proprietà della traccia.
Lavorare con Anvil Studio non è altro che creare e miscelare tracce.
Anvil Studio è dotato di 3 tipi di tracce:
1. Audio (che non si intende utilizzare nel tutorial)
2. Instrument (melodia, accordi, etc)
3. Rhythm (batteria)
L'immagine qui sotto mostra quattro tracce. Da questa finestra è possibile assegnare un nome alla nostra pista, selezionare uno strumento, il controllo del volume e l'effetto stereo, regolare il tempo, e tagliare e incollare parti della nostra canzone.
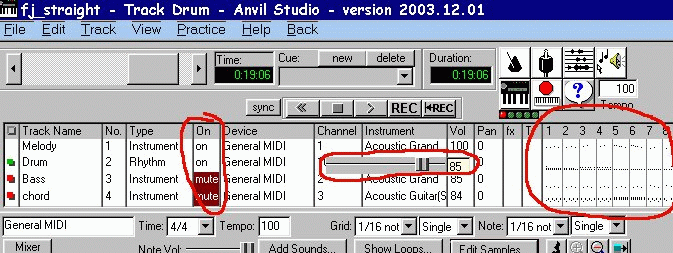
- In the Mixer window, you can adjust the relative volume of each track by clicking on "Vol" This opens a slider control from 0-100.
- In the same manner you can adjust "Pan" if you wish one track to be heard more in the Left or Right speaker.
- Also note that by clicking "On" you can toggle the playback of each track between On, Mute, and Solo...(These settings are for playback only: they do not do not save.)
- Circled in red on the far right, is an overview of the song by numbered measures. In this location it is possible to cut, copy and paste whole sections of the song.
* Allo stesso modo è possibile regolare "Pan" se si desidera un brano di essere ascoltato di più nell'altoparlante sinistro o destro.
* Si noti inoltre che, cliccando su "On" è possibile attivare o disattivare la riproduzione di ciascuna traccia tra On, Mute e Solo ... (Queste impostazioni valgono solo per la riproduzione:. Non lo fanno non salvare)
* Cerchiata in rosso in fondo a destra, c'è una panoramica della canzone con battute numerate. In questa posizione è possibile tagliare, copiare e incollare intere sezioni del brano.
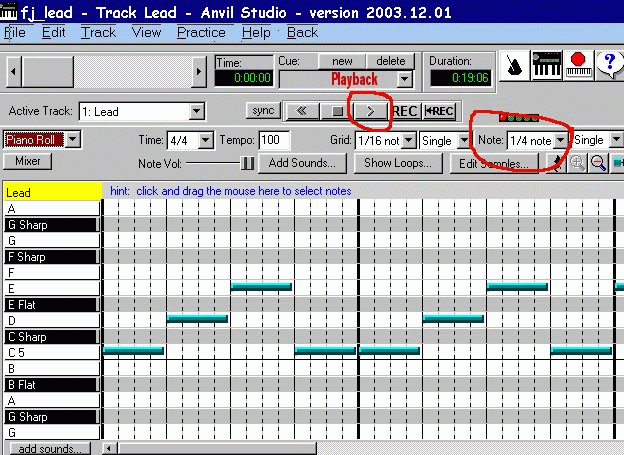
Composer view
There is another screen where we will do all of our actual composing. This is called the Composer. The Composer view is opened by clicking on the button marked "Compose" which is located in the lower left of the Mixer. There are three ways of viewing the Composer.
-
Lyrics: Since our song has no lyrics, we won't use this
- Staff: Use this to enter notes on a musical staff. This can be done by "drag & drop" or playing notes on a virtual keyboard. (You can change this to a guitar fretboard by right-clicking on the keyboard)
- Piano Roll: Enter notes as lines on a grid. No need to read music. This is the view we will be using.
Vi è un altro schermo dove faremo tutte le nostre effettive composizioni. Questo schermo è chiamato il Composer. La vista Composer si apre facendo clic sul pulsante "Compose" che si trova nella parte inferiore sinistra del Mixer. Ci sono tre modi di vedere il Composer.
*(Lyrics) Testo della canzone: Dal momento che la nostra canzone non ha parole, non lo useremo
* (Staff) Pentagramma: Permette di inserire note su un pentagramma musicale. Questo può essere fatto con "drag & drop" oppure suonando le note su una tastiera virtuale. (È possibile cambiarla con una tastiera di chitarra facendo clic destro sulla figura della tastiera)
* Piano Roll: Inserire le note come linee su una griglia. Non c'è bisogno di saper leggere la musica. Questa è la vista che useremo.
con questa "divisione della battuta" (Grid)
terminologia "Galmozzi": semiminima = TA=4 quadretti; croma= TI=2 quadretti; semicroma=TIRI=1quadretto; (minima= TA-A=8 quadretti; semibreve = TA-A-A-A=16quadretti)
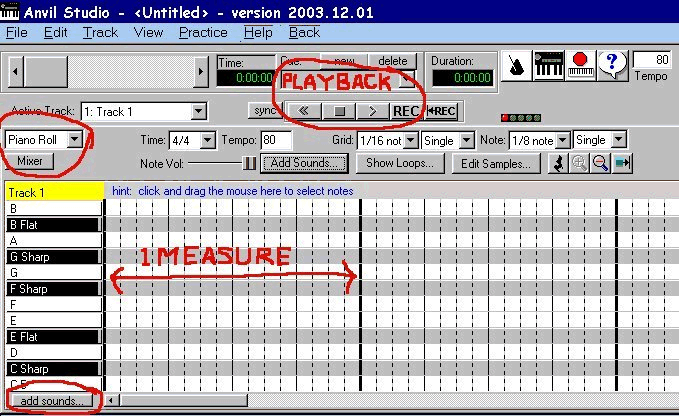
By clicking the Add Sounds button, you can change the range of notes available, or in the case of Rhythm tracks, which drums are available. This is pretty much all we need to know to get started. There are many other features Anvil Studio offers, and browsing the Help menu, is a good place to explore these.
On the next page, we will start by laying down a melody line, and build other tracks around it.
Nella pagina successiva, si comincerà con la linea melodica e poi costruiremo altre tracce attorno ad essa.
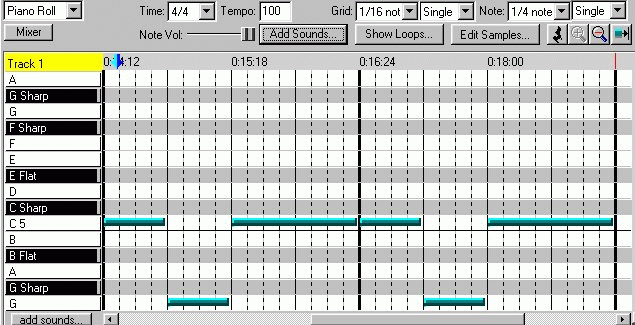
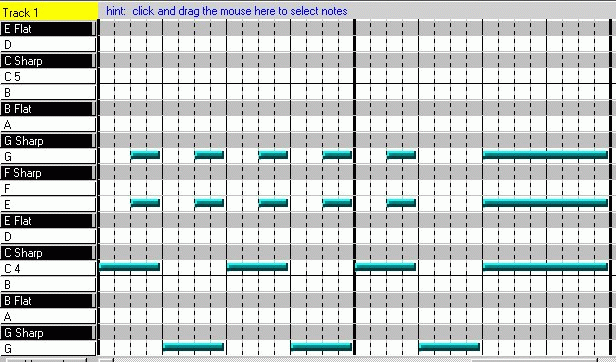
For our melody, I feel it is important to use a widely recognized tune. To this end I have selected Frere Jacques. Lame perhaps, but everybody should know the melody. We will use the key of "C major" so there will be no black keys, and this song has only one chord....."C"
Per la nostra melodia, ritengo che sia importante utilizzare una melodia molto nota. A tal fine ho scelto Frere Jacques. Stupida forse, ma probabilmente la conoscono tutti. Noi useremo la scala di "do maggiore", così non ci saranno tasti neri, e questa canzone ha un solo accordo "DO"
Now that we have set the track properties, we are ready to start entering notes to the track. This is done in the Composer window. Change to the Composer window by clicking the "Compose" button.
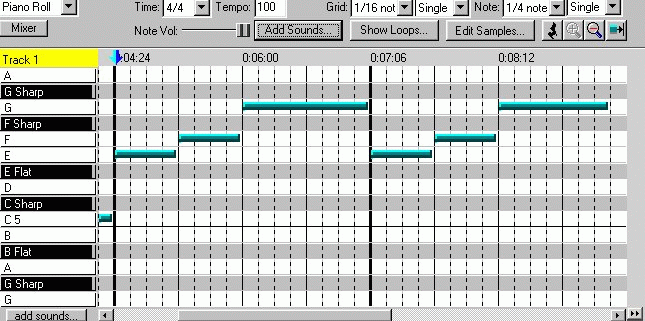
partendo dalla freccia blu: TA, TA, TA-A, TA, TA, TA-A,
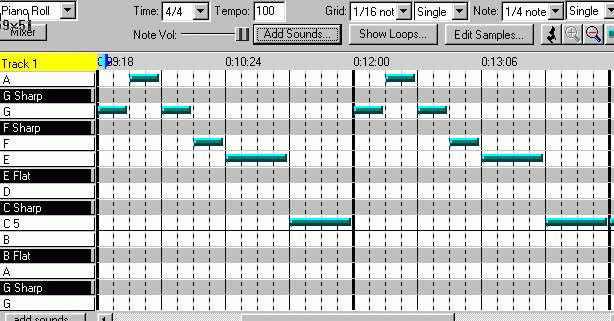
partendo dalla freccia blu: TI, TI, TI, TI, TA, TA, TI, TI, TI, TI, TA, TA
Let's add some drums to our song. First off, we need to create a new track, and name it. From the menu bar at the top, choose:
- Track > Create > Rhythm Track. Then go to the Compose screem, and click on the
- Add Sounds button. This brings up a menu of available drums. Put a check beside Bass and Snare. These two drums are the heart of a drum set. We will add more later.
- Click "OK." Now we should be back in the Piano Roll Composer window, and ready to add drum beats the same way we entered the melody notes on the previous page.
Aggiungiamo alcuni tamburi per la nostra canzone. Prima di tutto, abbiamo bisogno di creare una nuova traccia, e darle il nome. Dalla barra dei menu in alto, scegliere:
1. Track> Crea Track> Rhythm. Poi vai allo schermo Compose, e fai clic sul pulsante
2. ADDSOUNDS (Aggiungere suoni) . Questo fa comparire un menu di tamburi disponibili. Mettete una spunta accanto a Bass e Snare. Questi due tamburi sono il cuore di un drum set. Ne aggiungeremo altri più tardi.
3. Fare clic su "OK". Ora dovremmo essere di nuovo nella finestra Piano Roll Composer, e pronti ad aggiungere colpi di tamburo allo stesso modo in cui abbiamo inserito le note della melodia.


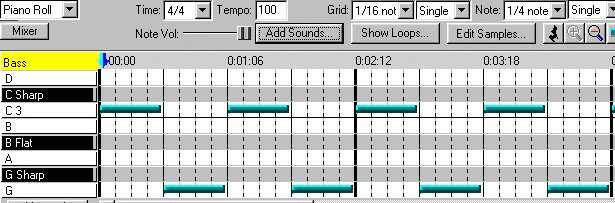
Bass occupies a position somewhere between drums and rhythm. In rock bands, bass and drums are considered the 'foundation.' Bass helps keep the beat, but also fills out the low end of the sound with notes which can enhance the melody. Bass can be covered by a variety of instruments: piano, tuba, cello, bass guitar, etc. Of course through the magic of midi, we could assign low notes to any instrument, but let's stick to what would be possible in the real world and use a bass guitar on our bass track.
Il Basso occupa una posizione intermedia fra tamburi e chitarra ritmica.
Nei gruppi rock, basso e batteria sono considerati le 'fondamenta'. Il basso aiuta a mantenere il ritmo, ma riempie anche la fascia bassa del suono con le note che possono migliorare la melodia. I bassi possono essere realizzati da una varietà di strumenti: pianoforte, tuba, violoncello, basso elettrico, ecc Naturalmente attraverso la magia del midi, si potrebbero assegnare note basse a qualsiasi strumento, ma cerchiamo di attenerci a ciò che sarebbe possibile nel mondo reale e utilizzare una chitarra basso sulla nostra traccia di basso.
- So first create a new track: Track > Create > Instrument Track.
- Now name your track by clicking on Track Name in the Mixer window.
- Select an instrument by clicking on Instrument in the Mixer window.
- Press the 'Compose' button.
- In the composer window, click 'Add Sounds' and select 'G2' for the lowest note, and show at least 7 notes.
2. Ora dai un nome alla traccia cliccando sul Track Name nella finestra Mixer.
3. Seleziona uno strumento facendo clic su uno strumento nella finestra Mixer.
4. Premere il pulsante 'Compose'.
5. Nella finestra di composizione, fare clic su AddSounds 'Aggiungi Suoni' e seleziona Sol2 'G2' per la nota più bassa, e mostra almeno 7 note.

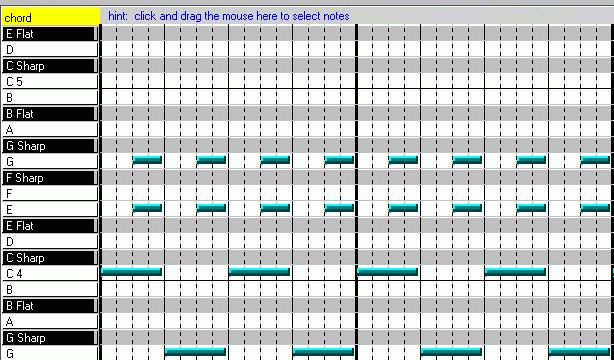
Chords are used to help keep rhythm, sometimes counter the melody, and many times set a mood. Since chords are several harmonious notes being played at the same time, they also they help fill out the sound. This song has only one chord: "C major." A review of the Chords section will show that a C major chord is made of the three notes: C, E, G.
Gli accordi sono usati per aiutare a mantenere il ritmo, a volte contro la melodia, e molte volte impongono uno stato d'animo. Dal momento che gli accordi sono diverse note armoniose suonate allo stesso tempo, esse aiutano a riempire il suono. Questa canzone ha un solo accordo: "Do maggiore". Un accordo di Do maggiore è composto da tre note: Do, Mi, Sol.
- Go ahead and create a new Instrument track, and name it "Chords."
- Choose an instrument. In the real world, not all single instruments are capable of playing chords. Some instruments are monophonic which means that they can only play one note at a time. For example, since horns are monophonic, you would need two or more instruments to play a chord. On the other hand, stringed instruments and keyboards are polyphonic and can play chords. I am going to use Acoustic Guitar.
- Click Add Sounds and set the lowest note to 'G3' with a range of at least 18.
2. Scegliere uno strumento. Nel mondo reale, non tutti i singoli strumenti sono in grado di suonare gli accordi. Alcuni strumenti sono monofonici che significa che possono giocare una sola nota alla volta. Ad esempio, poiché i corni sono monofoniche, si avrebbe bisogno di due o più corni per suonare un accordo. D'altro canto, strumenti a corde e le tastiere sono polifoniche e possono suonare gli accordi. Ho intenzione di utilizzare chitarra acustica.
3. Fare clic su AddSounds (Aggiungi Suoni) e impostare la nota più bassa a 'Sol3' con un intervallo di almeno 18.
fjchordsmidi
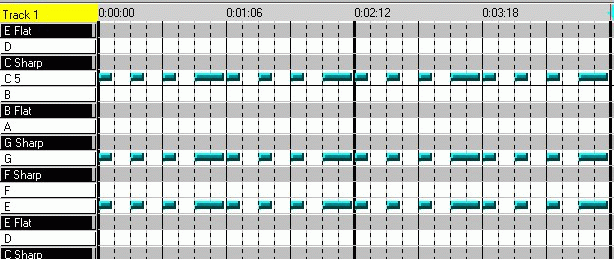
As we play back the song that is completed so far, it sounds good, but unfinished. In the same way that we altered the last measure of the chords to ring out the end, we can now go back and make some improvements to our bass and drums.
Risentendo la canzone che completata finora, essa suona bene, ma sembra non finita. Allo stesso modo in cui abbiamo modificato l'ultima battuta degli accordi , ora possiamo tornare indietro e apportare alcuni miglioramenti al nostro basso e batteria.
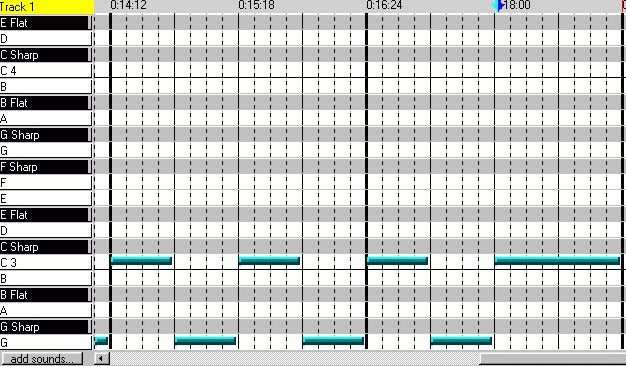
Bass Track:
In the Mixer window, click on the bass track, then open it in the Compose view. Scroll ahead to the last measure, and make it like the screenshot below......letting the last note ring.
Nella finestra Mixer, fare clic sulla traccia di basso, poi aprire nella visualizzazione di composizione (Compose). Scorrere avanti all'ultima battuta, e fare come la schermata qui sotto ...... lasciando che l'ultima nota risuoni piu' a lungo.
Drum Track:
Now the only thing left is to enhance the drum track. At a minimum, it should also signal the end of the song with the bass and chords. It might also be nice to add a few different rhythmic highlights during the song.
- In the Mixer window, click on the drum track, and open it in the Composer view
- Click Add Sounds and select a Tom, High Hat, and Cymbal. Click "OK"
- Back in the Composer view try adding something like this to measures 1 & 2:
Ora l'unica cosa che resta è quello di migliorare la traccia della batteria. Come minimo, dovrebbe anche segnare la fine del brano insieme al basso e alla chitarra ritmica (accordi). Potrebbe anche essere bello aggiungere una serie di accenti ritmici durante la canzone.
* Nella finestra Mixer, fare clic sulla traccia di batteria, e aprirlo in vista Composer
* Fare clic su Aggiungi Suoni e selezionare una Tom ("Muto" figura Num3), High Hat (Charleston), e piatti. Fare clic su "OK"
* Torna nella vista Composer prova ad aggiungere qualcosa di simile alle misure 1 e 2:

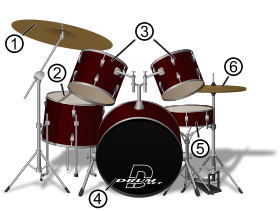
1 Piatti (Cymbal)
2 Muto a terra (floor tom)
3 Tamburi muti (toms)
4 Grancassa (bass drum)
5 Snare (rullante)
6 High hat (Charleston)


Up till now, our song is a fairly plain rendition of Frere Jacques, played once through. If we were to 'loop' this same song, it would get old real fast. If you listen to most popular music, you will hear that there are usually variations to the music to keep it interesting. There are many ways of doing this, I can think of a few:
- Changing instruments: This is standard in bands: different instruments will alternate "taking a lead"
- Vary the melody: Take the tune and add slight variations. This could also be a verse/refrain pattern.
- Key change: Change key up or down after a few times through.
- Change tempo: Start out slow and speed up, stops, etc.
- Change style: How would Chuck Berry or Bob Marley play it?
Fino ad ora, la nostra canzone è una resa abbastanza semplice di Frere Jacques.
Se dovessimo ripetere piu' volte questa stessa canzone, invecchierebbe in fretta. Se si ascolta la musica più famosa, si sente che di solito ci sono variazioni per la musica per mantenerla interessante. Ci sono molti modi per farlo, posso pensare ad alcuni:
* Cambiare gli strumenti: questo è lo standard nelle band: strumenti diversi si alterneranno "prendere la conduzione" (assoli)
* Variare la melodia: Prendere la melodia e aggiungere piccole variazioni. Questo potrebbe anche essere una strofa / ritornello.
* Cambiare tonalita': cambiare la tonalita' in su o giù un paio di volte .
* Cambia tempo: Inizio lento e accelerare, fermare, ecc
* Cambia stile: suonare alla Chuck Berry o alla Bob Marley ?
Minor Key
How would you play this song in a minor key? The recipe for a minor key is to flat the third (E), fifth (G), and seventh (B) notes in the scale. So if you open the song up and make those changes to all E, G, and B notes, it completely changes the feel of the song. [...] I envision the rhythm of a grave being dug by hand. Kind of creepy......
NOTA: ho i miei dubbi che sia vero quanto dice Tommy
Vedi Wikipedia per i due tipi di scala minore naturale e armonica.
Un vero rocker sceglie la minore armonica. Percio' bemolla la terza (mi) e la sesta (la).
Come si suona questa canzone in tono minore? La ricetta per una chiave minore è quello di diminuire (bemolle) la terza (Mi), quinta (Sol), e la settima (Si) nota della scala. Quindi, se si apre il brano e fai tali modifiche a tutte le note Si, MI, Sol, esso cambia completamente l'atmosfera della canzone. Rallentando il tempo, con un organo da chiesa a suonare gli accordi, con i tamburi che si alternano tra basso e campanaccio, Mi immagino il ritmo di una tomba scavata a mano. Un po 'spaventoso ......
per ammutolire un traccia, in Composer cliccare una volta su On (sulla riga corrispondente)
per ascoltare solo quella traccia, cliccare un'altra volta sul suo On.
Il file midi si scarica cliccando il link daytripper col tasto destro del mouse e poi si apre da Anvil
(File ==> Open Song)
Altro esempio: staying alive