Cameras and lights in Daz Studio - by maclean
Intro
This tutorial is a straightforward, non-technical explanation of how to use cameras and lights in daz studio. The last section deals with building a scene step-by-step, and adding cameras and lights for different effects. The reason I'm covering both cameras and lights is that they're very closely interlinked. Cameras can act as helpers to lights, and when you're setting up lighting, using the cameras will make it a lot easier.
The Daz Studio interface (v 1.0.1.0.1)
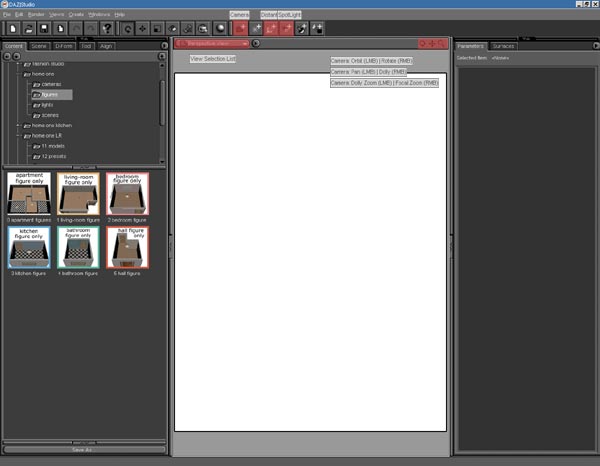
Here's a screenshot of my D|S interface with some of the relevant controls highlighted. In case it hadn't occurred to you, there's a good reason for keeping the default neutral gray color scheme. It allows you to accurately judge colors in the viewport without distraction. Using a lurid green or hot pink color scheme may have lots of novelty value, but it'll drastically affect your ability to evaluate color.
Part 1 - Cameras
The View pane

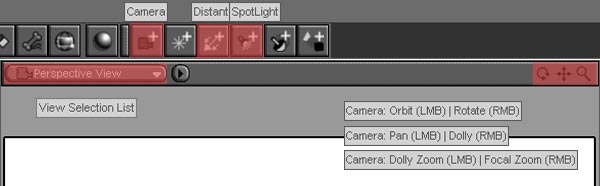
The image above shows the View pane with pop-up descriptions (edited to fit them in). The easiest way to understand cameras in daz studio is to imagine that you're holding the camera yourself, and for convenience, the View pane icons can be divided into 3 groups of 3 - top row, bottom row and right-hand side. If you look at the groups below, you'll see the logic behind this.
top row - Rotate / Dolly Zoom / Bank - These 3 movements are equivalent to you holding the camera and staying in one fixed position.
bottom row - Pan / Orbit / Dolly - These 3 movements are equivalent to you holding the camera and changing your position.
right - Frame / Aim at / Reset - Framing commands.
top row - fixed camera position
 Rotate - Rotates the camera on it's own axis. This is like you holding the camera and turning around so that the camera moves with you.
 Dolly zoom - Zooms in on the scene by moving the camera on the Z axis. According to the manual, this is supposed to change the focal length of the lens, but in fact, it moves the camera itself without affecting focal length.
 Bank - Tilts the camera from side to side (Affects Zrotate value only)
bottom row - changing camera position
 Pan - This is like you holding the camera and moving up/down or left/right (Affects only XY translation values)
 Orbit - Orbits the camera around the scene. Like you holding the camera and circling around the scene, with the camera always pointing at the center.
 Dolly - moves the camera on the XZ axes. Like you holding the camera and moving forward/backward (mouse up-down), or left/right (mouse left-right).
right - framing controls
 Frame (CTRL-F) - frames the currently selected object. If nothing is selected, it frames the entire scene
 Aim at (CTRL-SHIFT-A) - aims at the currently selected object. If nothing is selected, it aims at the entire scene
 Reset (CTRL-ALT-R) - Resets a camera's values to the default settings
The Frame command affects a camera's translation settings, and Aim at affects the camera's target, which is the point it rotates around. When you first create a scene, the center of the document is the target for all cameras. In other words, they point at the center of the scene and rotate around it. As soon as an object is selected and Aim at is used, that object becomes the new target.
Note - In theory, Frame and Aim at are two separate functions, but in fact, using Frame also aims the camera at the selected object.
Note - A 'dolly' is a movable camera platform, sometimes placed on a small railroad track. In 3d, to dolly, simply means to move back/forward. Remember that there's a difference between Dolly Zoom and Focal Zoom (see Viewport icons). Dolly Zoom moves the camera itself, whereas Focal Zoom changes the focal length of the lens.
The Viewport icons

I don't use the View pane at all. I find it much easier to use the 3 camera icons at the top of the viewport. They're similar to the icons in the View pane, depending on whether you use the left or right mouse button. You can also use the mouse wheel to zoom in/out - towards you = zoom in / away from you = zoom out.
 Orbit - (left mouse button + drag) / Rotate - (right mouse button + drag)
 Pan - (left mouse button + drag) / Dolly - (right mouse button + drag)
 Dolly Zoom - (left mouse button + drag) / Focal Zoom - (right mouse button + drag)
The default cameras
CTRL-P - perspective view - views the scene from any angle
All the other cameras are Orthographic ('ortho' from the Greek, meaning straight or correct). They only show a 2-dimensional view and can't be rotated. The frame command works with Orthographic cameras, but not aim at (because there's no rotation).
CTRL-down arrow - front view - views the scene from the front
CTRL-up arrow - back view - views the scene from the back
ALT-down arrow - bottom view - views the scene from the bottom
ALT-up arrow - top view - views the scene from the top
CTRL-left arrow - right view - views the scene from the left (shows the right-hand side of the scene, looking from the left)
CTRL-right arrow - left view - views the scene from the right (shows the left-hand side of the scene, looking from the right)
Part 2 - Using cameras
Creating new cameras

The Perspective camera is only a default tool and you can't set it's parameters to precise values. I'm going to create a new camera, which will give me a 2nd viewpoint, and allow me to configure it the way I want. It will also be useful when creating lights. To create a camera, use Menu> Create> New Camera, or click the New Camera icon. But first, I'm going to use the perspective camera as a guide to it's position and viewpoint. I can position the perspective camera roughly where I want my new camera, then copy it's settings in the Create New Camera dialog.

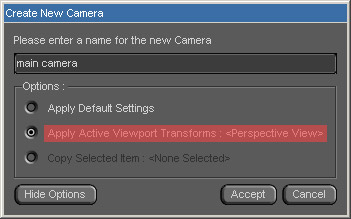
The screenshots above show the Create New Camera dialogs with the relevant buttons and controls highlighted. To create a new camera, click on the icon in the toolbar and a dialog will open. If the options aren't visible, click on the Show Options button. I'll name my camera main camera so it's easily identifable, and check the option to copy the perspective camera's settings.
Options
The default settings for a new camera are zero values for all settings, except Ytrans = 105.00 / Ztrans = 360.00 / Focal Length = 50mm / Focal distance = 360.00. These settings are designed to frame a normal human figure, with the camera pointing at the center of the hip.
* In daz studio, the settings for both cameras and lights are fully interchangable, because they both 'see' the scene. A new camera can either use an existing camera's viewpoint, or that of a light, and a new light can use the viewpoint of an existing light, or that of a camera. See next section.
The View Selection List

The dropdown menu above the viewport (called the View Selection List), shows all the default cameras, plus any new ones you've created. New lights will also be listed there. Why list lights along with the cameras? Well, that's because every light has a built-in camera, called a shadowcam, which is used to calculate the view that the light 'sees', and where the shadows should fall in the scene. But you can also use the shadowcam to improve your lighting. By looking through it, you can see what your light sees, and any adjustment you make to the light, like movement or rotation, will show in the viewport. See Using lights for more information.
Saving cameras
In the main Preferences dialog (Menu> Edit> Preferences> Save Filters), you can set the options which appear when you save various types of preset (DForm, Pose, Cameras, Lights). If you check the 'Always display these options' radio button in Preferences, the Save dialog will show the options every time you save these presets. For cameras and lights, the options currently available are for single frame/animation and all cameras/selected cameras. This second option allows you to choose which cameras/lights you want to save, rather than saving every camera or light in the scene. In the Scene pane, simply select the cameras/lights you want to save. You can select single items by holding down CTRL and clicking each one.
When you save an entire scene, it will re-open using the last used camera view. If the selected camera was a default camera, like Perspective, the scene will re-open with the camera at the default settings. If the selected camera was one that you created, the scene will re-open exactly as you left it.
Depth of field
The daz studio manual isn't exactly over-talkative on this topic, so I'll try and add some extra information. Depth of field isn't black magic. It can be learned fairly easily with a bit of effort.
Important - To see depth of field in a render, you must go to Menu> Render> Render Settings> (CTRL-SHIFT-R), and in the Advanced Tab, check the Depth of Field box to switch it on.
Here are the 4 main terms we'll be dealing with.
Focal Length
When you use a camera in real life, there are two ways to vary the distance between you and your subject. One is to physically move backwards or forwards, the other is to adjust the Focal Length of the lens. Focal Length is measured in millimeters, and it controls the area the lens covers, (and as a side-effect, it's depth of field and perspective). The accepted standard for a 'normal' view is 50mm, which roughly corresponds to what the human eye sees. As you reduce the Focal Length, the camera lens shows a wider area, and at 35mm and under, becomes a wide-angle lens. As you increase it, the lens shows a smaller area, becoming a telephoto at 85mm and above. Lenses from 24 - 35mm are considered as wide-angle, from 16 - 20mm as extreme wide-angle, and below 16mm, they're called 'fish-eye' lenses. The standard for a portrait lens is 85 - 105mm, 120 - 300 is telephoto, and 300mm and beyond means you're probably photographing a lion or other wild animal (a rock star, for example).
Focal Distance / Point of Focus
The Focal Distance setting is completely different from Focal Length. To go back to our real-world camera example, the other way to change the distance between you and the subject is to actually move with the camera. If you focus a camera lens on an object, then walk back ten steps, the object will be out of focus. This is because the Focal Distance between you and your subject has changed. In plain English, it's the distance between your lens and the object it's focused on.
In daz studio, Focal Distance is set automatically when you move a camera back/forward (with the Dolly icon or Dolly Zoom above the viewport). I say 'move', because you're not zooming, in the accepted sense of changing the focal length of the lens. You're changing the camera position, moving it back/forward, and as you move the camera, the Focal Distance changes automatically to maintain the same point of focus. It's similar to focusing a camera lens. You can change the Focal Distance without moving the camera, by dragging the slider in parameters. When you do this, you're actually moving the point of focus, and your render will probably be out of focus. However, there are uses for this.
In the setup below, I created 10 'playing cards' out of cube primitives and spaced them at 1 meter intervals (using the floor grid), with the 1st one at zero. I created a camera with a Focal Length of 1000mm (extreme telephoto), and to get an idea of the Focal Distance, I deselected everything, and used aim at to center the whole scene. This gave me a Focal Distance of approximately 6500. I then selected the the 1st, 6th and 10th playing cards one by one, and used aim at to focus the camera on them. This gave me Focal Distances of approximately 6000, 6500 and 6900. Next, I re-framed the scene and did renders without moving the camera, but manually setting the Focal Distance at these 3 settings. As you can see, the point of focus changes with the Focal Distance.

Depth of field
The human eye has depth of field in exactly the same way a camera lens does. In fact, a camera lens is simply a mechanical version of the eye. But to us, all objects 'seem' to be in focus, no matter how near or far away they are. Of course, they're not, but the human eye reacts so quickly to small movements that we rarely notice it. I can explain depth of field in about 20 seconds. Hold your finger up about 15cm (6") from your eye and focus on it. You'll see that the background behind is out of focus. Now focus on the background, and your finger willl be out of focus. That's depth of field.
It refers to the area which will remain in focus, (in front of and behind), the point your eye or camera lens is focused on. Example - The camera is focused on an object 3 meters away. The depth of field might go from 30 centimeters in front to 50 cm behind that point. (With photographic lenses, there's always more in focus behind the object, than in front of it). In other words, an area from 2.70m - 3.50m would be in focus, and everything in front of and behind that area will be out of focus. Unfortunately, in a 3d preview, we can't see depth of field, so we're reduced to guessing and rendering to see if we're right. There may be a mathematical way to calculate it, but I certainly don't know what it is.
In photography, a wide-angle lens has far more depth of field than a telephoto. As you increase the Focal Length, the depth of field decreases. However, in 3d, it doesn't appear to make any difference what Focal Length you use. The results are the same. Another difference is that 3d cameras don't have a diaphragm which can be set at different apertures to vary the depth of field. These aspects of depth of field are complex, and since we can't do it anyway, it's pointless to go into it.
So, what are the practical uses of all this? OK, let's say you're rendering a full head shot and you want the focus to be on the tip of the nose with the rest of the head slightly out of focus. Normally, the camera will frame the whole head and adjust the depth of field to suit, and since the head is one single body part, you can't select bits of it, like the nose or ears. But by lining up a thin object (I used a scaled cube) with the tip of the nose and using aim at, you can figure out the correct Focal Distance for the nose. You must then undo the aim at movement to reframe the head and reset the camera. (All movements for created cameras can be undone in daz studio). Then set the new Focal Distance and render. Which is exactly what I did in the image below. As follows.
Lighting - 2 spotlights copied from the camera settings with the 1st one moved in to cover only the eyes - Intensity 90% / Shadow Softness 10%. The 2nd spot was pulled out further away as a fill light - Intensity 60% / no shadows.

Part 3 - Using lights
Positioning lights
If you position lights by moving them around, looking at the scene, doing test renders, and generally guessing at the whole business, you're doing it the hard way. As I mentioned earlier, each created light has it's own camera view, and the best way to position lights is to use this view. It shows you exactly what the light 'sees', and can be used like a normal camera. Not only that, you can use both the frame and aim at commands with a light, so it centers an object, or orbits around it. All you need to do is create a light, select it's name in the dropdown camera menu, then point it anywhere you like. You can move/rotate it just like a normal camera by using the icons in the View pane or above the viewport, the parameter sliders, or the frame/aim at commands. Whatever you see in the viewport is exactly where the light will fall.
Types of light
Default settings - The default settings for all lights are zero for all channels. This places a light in the exact center of the viewport, on the floor, and pointing straight towards the back of the scene. Scaling has no effect on the light itself. It only affects the light's icon, (the visual representation of the light). Point lights only have one general scale slider.
Light options
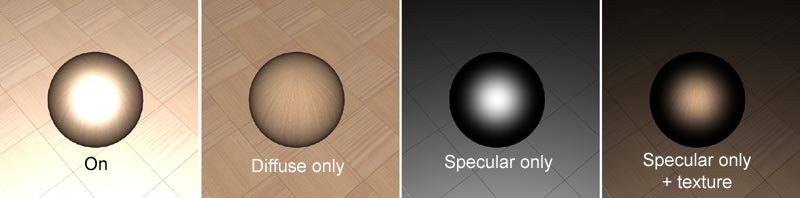
Four of the options for lights - Visible, Selectable, Cast Shadows and Color - don't need much explanation, but the fifth one, Illumination, probably does. The Illumination bar has 4 options - Off, Diffuse Only, Specular Only, On. Off and On are fairly obvious, but Diffuse/Specular puzzle a lot of people. Diffuse Color is the color of the primary material on an object, and it's normally white when we apply a texture to it. In real life, if a ball is red, in 3d, it's Diffuse Color would be red. But real-life objects not only have color, they also reflect light in varying degrees according to their material properties. This is where Specular Color comes into play. On a simplified level, if our red ball were made of non-reflective rubber, it's Specular Color would be black. If it were made of glossy plastic, and highly reflective, it's Specular Color would be white. The Specular Color and it's other settings, (Glossiness/Strength), control the intensity, color and spread (size) of the highlights.
Think of Diffuse (material color) and Specular (highlights) as being two separate surfaces wrapped around the object. By using the Diffuse/Specular Only lighting options, lights can be set to only show one of these two surfaces and filter out the other. It's similar to using an infra-red light, which only shows light waves emitted in a narrow range of the spectrum. If you use Diffuse Only, in a render, all surfaces will be matte, with no highlights at all. The Specular settings on your materials have been filtered out completely. If you use Specular Only, the Diffuse settings, (including textures), will be filtered out and you'll see nothing but highlights.
"What's the point of having these options?" I hear you cry. Well, to take a banal example, suppose you add a new light to a scene. After you render, you see huge highlights where you didn't want them. You need the extra light, but you don't want the highlights. Set it to Diffuse Only, and you'll get the same lighting without the highlights. In another situation, you may be rendering a crystal chandelier. You want extra highlights, but not extra light. Set a new light to Specular Only and it'll only show the highlights.
One thing to bear in mind is that if you use Specular Only and want to see the texture, you'll have to apply the texture to the Specular Color. Since the Diffuse channel is being filtered out altogether, textures won't show up unless they're applied to the Specular channel.
Light color
In real life, the color of light is determined by two things - the light source itself, and the objects it bounces off. Light color is measured in degrees Kelvin. The lower the value, the 'warmer' the light. For example, standard sunlight is generally 5500° Kelvin. In the afternoon, it begins to get warmer, ie. yellow/red, and at sunset, it's red, with a value of 2000-3000° Kelvin. Artificial light sources vary in color. Tungsten (household) lamps are about 3400°, which is yellow/orange. Fire or torchlight is even redder. Any light source will also be affected by the objects it bounces off. If you're in a room with red walls, the sunlight coming in will bounce off the walls and gain a reddish tint. If you're in the jungle, the light will be greenish, from the leaves.
So, if you use 4 lights, colored green, red, blue and yellow, it'll be fine if your scene is set on the planet Zarg with it's 4 suns, all different colors. But if you're sticking to scenes on planet Earth, you'd be better to restrain your implulse to color every light differently, (unless you're in a disco, that is). Start with lights which have a color resembling reality, then if necessary, tint them to match the surroundings.
In lighting, less is usually more. As a photographer, I tend to use the minimum number of lights, and in 3d, things aren't that different.
Lighting setups can be complex, but it's best to always start with a single light and add the others one at a time. Don't put in 5 lights and try to figure them all out at once. Each one affects the others, and you'll only end up going crazy. Multiple lights should follow the rules of reality, which is usually one main light source, with added fills to simulate bounced light. If you want to see how ludicrous multiple light sources can look, watch the original series of Star Trek. Most of the scenes on 'alien planets' have 3 or 4 lights crossing over one another, casting multiple shadows and generally looking extremely tacky. Cute when seen 40 years later, but not exactly recommended as a role model for reality.
Shadow parameters
The Shadow Bias is the one that most people seem to have trouble with. Here's what the Daz Studio manual has to say about it.
The Shadow Bias parameter specifies how far to shift samples towards the light source to prevent objects casting shadows across themselves (self-shadowing). Increasing the bias value increases the sample shift, and vice-versa.
Really helpful, isn't it? Well, for those of you who don't speak Gobbledygook, I've taken the liberty of translating that into English. This is what it means in practical terms.
When the Shadow Bias is too low, banding occurs in the shadows. When the value is too high, shadows look as if they're separated from the object.
With high Shadow Bias values, a shadow 'detaches' itself from it's object, giving the impression that the object is separated from the surface it's sitting on. The renders below illustrate the problem. In the first render, there's obvious banding, which disappears in the second (the default value). But in the 3rd and 4th renders, the shadow of the bar has vanished from the top of the cube, and the shadow of the cube itself is 'detached', making the cube look as though it's floating above the floor. These renders were done with a simple, one-light setup, and Shadow Softness was set to 0.00. If I'd increased the softness, the banding would have been a lot more noticable. The softer the shadow is, the more banding you'll see. So, always set your Shadow Softness before adjusting the Shadow Bias.

negative lights
A negative light is a light set to a minus intensity value, which darkens the object, taking light away from it, instead of adding light to it. To get negative values for a light, select it, and in the parameters pane, double-click the name of the Intensity slider. In the dialog that appears, change Respect limits from Yes to No. Now you can set it to a negative intensity. One big advantage is that you can actually see the 'darkness' from a negative light in the preview. It's just like a normal light, except dark instead of light. Here's a render of the setup I used earlier for depth of field, with a value of -90% on the main spotlight and pulled back slightly, and the other fill light the same as it was before.
Being incurably nosy, when I was writing this tutorial, I discovered some peculiar things about negative lights that I didn't know before. On a hunch, I tried enabling shadows, and found (to my great delight) that the shadows are light instead of dark. You can see this more clearly in the render on the right. Normally, you wouldn't switch shadows on for a negative light, and I haven't had time to work out the possibilities yet, but I'm sure there's a use for negative shadows too. Another, even more bizarre effect is that, not only does it reverse the intensity, it also reverses the color. If you set the light's color to red, it will come out as green.

Saving lights
The save procedure for lights is exactly the same as for cameras. See Saving cameras above.
Part 4 - Doing it
A step at a time
Now we know everything about cameras and lights, let's boogie on down and do the funky chicken, as they used to say in the 70s. I'm going to build a scene, step by step, adding the cameras and lights I need to create something vaguely interesting. By the way, this isn't anything I've planned or already done, and I don't claim to be a great 3d artist. I'm doing it as I write this, so I'm just going to try a seat-of-the-pants scene, dealing with the problems as they arise. Apologies in advance for using commercial products that you may not have, but I need an environment, and I don't have any except the ones I build myself.

Here's a screenshot of daz studio after I've loaded my figure (a living-room). It's offset from the center because it's one section of an apartment.
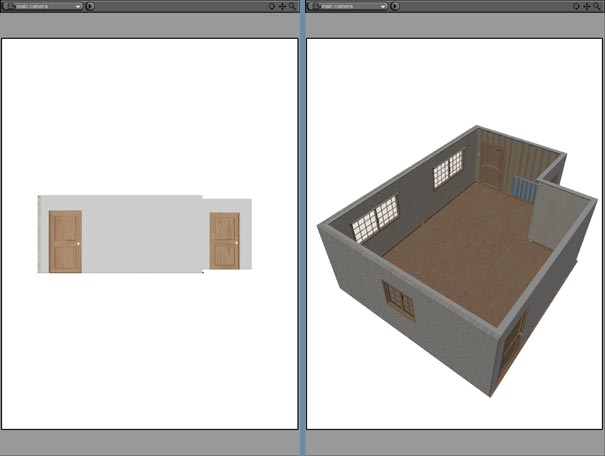
I used frame (ctrl-f) on the Perspective camera to center the figure, then added my main camera (as explained above), by copying the settings from the Perspective camera (left pic). I then set it's Focal Length to 30mm for a wider view, and rotated the camera to view the room properly (right pic).

What I'd like to do is have sunlight coming through the windows, so my first move is to use the Perspective camera to find the viewpoint I want for the light. The figure is already framed in the Perspective camera, so all I need to do is rotate the camera to the back of the room and zoom in slightly.
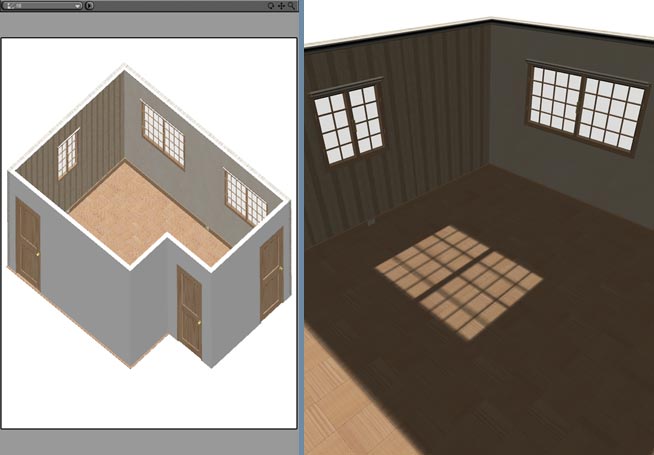
Next I add a new Distant light, naming it sunlight, and copying the settings from the Perspective camera. I usually prefer to use spotlights, but for a strong source like sunlight, a distant light is ideal. When I select that light in the View Selection List above the viewport, I see the same view my light is seeing (left pic).
I zoomed in a bit with the main camera and did the render on the right, to get an idea of what the shadows look like. I can see the light hitting the radiator on the right wall, but if I switch the ceiling of the room on, that'll disappear, so it's not a problem. But at this point, the light's settings are still at default, and I'm seeing 'banding' in the shadows. This means that the Shadow Bias setting is too low.
In order to check the banding without moving my main camera, I created another new camera, copied the main camera's settings, and zoomed it in on the shadows. I did some test renders from a closer viewpoint, and after a bit of experimenting, decided that the banding disappears between a slider value of 3.00 and 4.00, so I set it to 4.00 to be on the safe side, then deleted the test camera I created.
I left the Shadow softness value at 0.00, because I want the sunlight to be quite hard, but I'll set Intensity to 120% and the color to a pale yellow (254/247/233).
Looking around the scene, I've decided it's smarter to use the other side of room where there are two windows and a bit more space. So I rotated the main camera to a new viewpoint. Since the room's pretty dark, I'm going to add a fill light. In the real world, light bounces all over the place. A pure, untainted light source doesn't exist in nature. It interacts with any object it meets, reflecting off the walls, floor and ceiling of a room, and in 3d, a fill is the simplest way to reproduce this effect.
I created another Distant light, using the main camera's new setttings. A fill light shouldn't cast a new set of shadows, so I've switched 'cast shadows' off, set the intensity to 50% and the color to match the sunlight. The settings are temporary at the moment, and I'll probably move it around once I have a better idea of what the scene's going to look like.

Well, I've got the basic setup, so it's time to fill up the scene now. I'm going to add some furniture, a carpet and a few props. You can see what the scene looks like on the left. Problem is, the sunlight looks OK, but it could be improved. Instead of undoing my changes if I don't like them, I'm going to add a 2nd sunlight, copying the settings from the one I have. I'll switch off the 1st, and move the 2nd one around. If I don't like it, I can delete it and switch the original back on. First, I select the light, then add a new one, using the <Copy Selected Item option>.
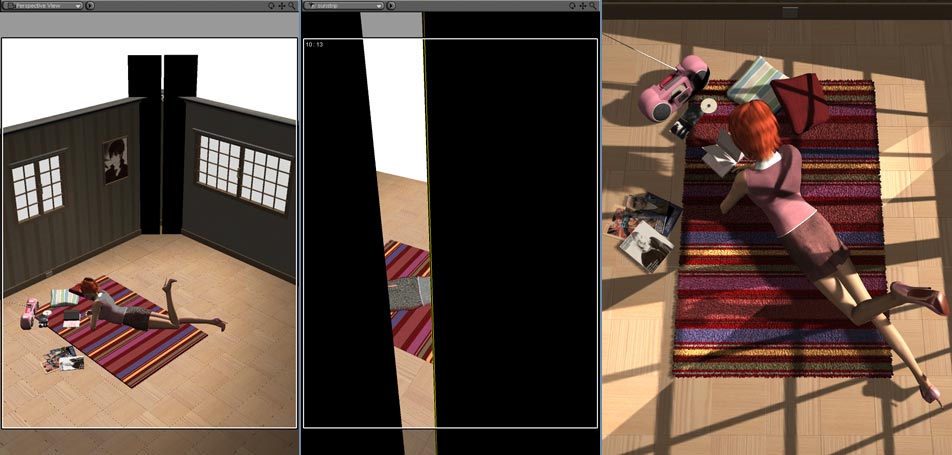
Well, I tried that and it didn't work so well, mainly because a distant light can't be moved, only rotated. To get the effect I want, I'll have to use a spotlight. So I did the same again, creating another copy of the sunlight, but this time with a spotlight. The center pic shows the view through my new 'sunspot'. I chose the sunspot camera view in the drop down menu, selected the window body part and used the frame command to center it, then rotated the view slightly until I could see the carpet and props. The 3rd image shows the difference in the shadows. Because the spotlight can be positioned near to the window, it gives me the angled shadows I can't get with a distant light.

My original sunlight may not be wasted. The window on the left should also let in some light. Selecting the light's view and rotating it to shine in that window gives me a bit more fill (left pic). I cut down the intensity to 40% and switched off Cast Shadows. I've loaded a modified V3 figure I have (she's a taller, thinner fashion model type), so the scene's complete enough now to get more creative with the cameras. What I can see through the main camera is fine, but it's not going to win any prizes for originality. As a photographer, I always look for a different viewpoint, and in this scene, coming in from the top would probably work. It's a bit obvious, but I'm not going to be entering it in any art competitions, so I can live with that.
The perspective camera is always useful to get an idea of what you want. I can move around the scene with it and find a rough position, then create a new top camera by copying the settings. To make it less boring, I'm going to use a wide-angle Focal Length of 15mm and dolly the camera down to zoom in on the scene. When you're looking at a scene like this from above, you need to give it some dimension, and the model's leg is pointing up, so a wide-angle lens will exaggerate that slightly.
At this point, since I don't have the table and chairs in the scene, but they're casting an unwanted shadow, I deleted them. I moved a few props around, cut down the fill light from 50% to 30%, and increased the sunspot from 120% to 140%. This gives me higher contrast and deeper shadows.
I have a lot of diagonals going in on this image, so to pep things up a bit, I made another strip of light which crosses the model. I added a new sunstrip light, copying the settings from the sunspot, but cutting the intensity to 80%. I positioned it behind two panels - DS cube primitives scaled to size (Xscale=100%/Yscale=600%/Zscale=1%), and colored black. (An old habit of all photographers, but unnecessary, since 3d objects don't reflect light).
I'm not going to pretend that I got it right at the first attempt, because I didn't. The problem was getting the shadow at exactly the same height as the sunspot's shadow. If the two shadows come from different heights, it looks totally fake. I had to squeeze everything right into the corner of the room, and it took a bit of messing about to get the light in the right position. In the left and center images above, you can see the position of the panels and the view through the sunstrip light. The light is right at the top corner where the two walls meet. The 3rd image shows the final render from above. The new strip of light isn't exactly natural-looking, but it does make the image more dynamic, and it adds some depth and color to the render.

Moving right along, I thought it might be fun to try the same scene by moonlight, instead of sunlight. That was easily done by changing the color of the lights to blue (RGB 157/179/217), and softening the shadows (left pic). To get some indoor light in the scene, I used a reading lamp of my own which already had a parented light in it, colored a deep yellow/orange to give a tungsten light effect. I added another fill light of the same color, coming from the bottom left of the scene, to simulate room lighting, and removed the strip light (right pic).
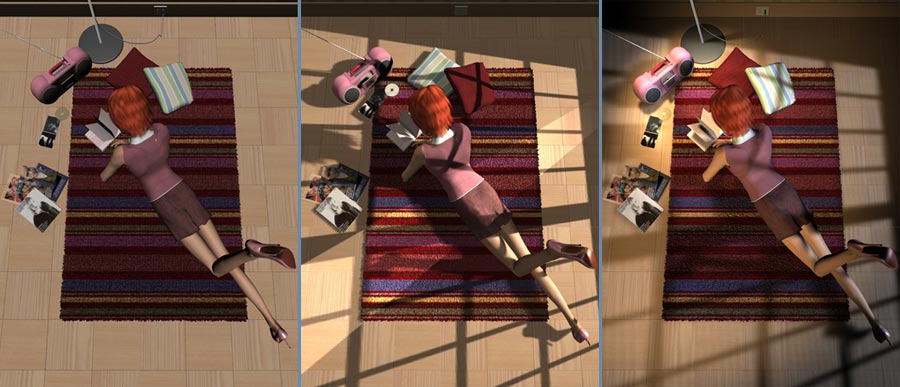
As a comparison, here are renders of the scene using OpenGL lighting, sunlight and indoor light.
Outro
I hope this tutorial answers some of the more common questions people continually ask. Even as I was writing it, I had to stop along the way a few times and double-check things I already knew. And if I didn't actually learn anything new, I gained a better understanding of the processes, merely by sitting down and following them through, step by step.
The advantage of 3d is that it allows us to create scenes of any kind, based on reality or fantasy. You can argue that any one aspect of 3d is crucial, from the characters to the materials to the viewpoint and lighting, but it's not true. Every aspect is important and having wonderful lighting won't compensate for a boring subject. But it will make almost any subject more lifelike, and knowing how to control it will allow you to create realistic scenes in any conditions, from a darkened coal cellar to an arctic igloo.
bye!
mac
Product credits
Victoria 3 - DAZ
Messy hair - kozaburo
shoes - jim burton
Home One Apartment - maclean
Home One Living-room - maclean
Rainy Day - maclean
shirt - unknown
skirt - zygote