A TOWER FOR EVERYONE!

(CLICK HERE to see drawings)


Beginning of my amateur radio was young and without money, but with an inordinate passion for this hobby that I forced to cope with financial problems with the home made.
Course the trestle was my first obstacle, like for those who plan to mount an antenna, and then I had to study long a solution that would allow me to have an object secure, robust, easy and fast to build!
And leafing through a magazine my eye fell on the trellis Giovannini tubular framework with which I adopted sliding some mechanical solutions, but then I had to adapt to my needs proving the so-called JOLLY!

But let's start with order and, above all, you are looking for among these lines a practical solution and fast, do not change page!
The lattice type Giovannini tubular framework, I said, it was the example on which I based my project: initially were only 6 mt (many are those who are in whole rods) that I had divided into 3 sections by 1.5 meters, 2.5 meters and 2 meters.
These measures are crucial for the installation of the first section the lattice without experience special difficulties installation keeping your feet firmly on the roof and without give someone a hand (so rare to find these people!).
We will see later how.

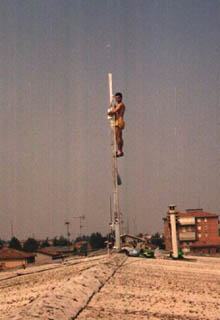
The tower in question, then, is a rod of 6 mt of iron under 80 x 80 mm and cut into sections to allow installation without great stunts, so you need to know how much space we have vertical attic and the wall structure as being there help support them, before cutting into slices our pipe.

If you subscribe to a bearing wall, to fix the tower is strongly recommended a series of brackets that can stop the same with the threaded rods through the wall bearing in mind between the wall and trellis will be interposed any material that could serve to absorb vibrations that will arise in the future wind or when he pulls the antennas will turn with the rotor.

General condition: REMEMBER TO BRING A BOWL OR A TANK AT THE BASE SUITABLE
The collection of condensation will form 'Inexorably!
Having established this, measures are taken in the first leg of trellis that will leave the roof for about 1 m and that, under the roof,
be a measure likely to encourage a good situation stability and robustness (from 1 mt up) then we will find the first part the tower to be approximately 2 meters.
At this point we must consider the measure next a stand with his feet firmly planted on the roof of my measure is 2.5 mt.

WARNING: This measure seems simple, after all, but when we located on the roof alone, unarmed, with piece in hand to insert in the section below and you realize that he's not very light, well, I assure you that things change much!
So I recommend a winch system with post secondary working attached to the base of the pylon that can help in this and stages of installation.

Cut the second piece, rest 1.5 meters, which will therefore be more light weight to pull up, and somehow we must close this tube,
if we do not want it filled with water to any shower.
In this regard I have provided by welding a piece of 80 x 80 mm 50 cm long, a plate of 80x80x10 mm.e so we also
the "plug" that closes the head of the trestle.
Now we move to the phase of the various joints between the pieces just described.
You will have to fix one side of the piece, inside, two angular 70 x 70 x 5 mm. where 20 cm long 40 cm will be set within the
basis of the second section and 20 cm will be those who are sticking to section below. The pieces are so fixed with the bolts in
stainless steel mm. 6 x 20 and should be placed so that allow the sliding of the carriage.


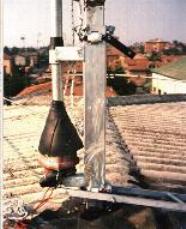
Your basket: I have adopted a system quite inconvenient, indeed, but that gives me more confidence. This is a square tube 100x100 mm
1 mt long, on which I placed the wheels to keep it centered and the basis of which I made a plate with welded reinforcements to make you stay the rotor.
The other side was welded a pipe that has the function of keep driving the mast and thrust bearing.
You can possibly try to make a cart with angular 50 x 50 x 5 mm and adapt everything to the need, but here I have no data
suggest.

Of course, for the base of the rotor, everyone will adjust based on the their needs. Remember to create a system for attaching
for the guy who put in tension during the lifting of  basket.
Arrived at this point, we must determine where the wheels go for make sure that does not intersect with the heads of the bolts that secure
our host tower of the three pieces, so be careful with the provision completely before proceeding with the placement or bolts or
wheels.

Is possible to make slides Teflon insert inside cart, replacing the wheels, and placing the same in the corners: results much easier, as
home made. I suggest the listings from 8x20x100 mm.
During installation the truck will square tube mounted course before entering the second leg of the trestle, while that could be mounted in angle after installation over, if held together with bolts and not welded.

To raise the basket, and everything you assemble, I suggest a winch with a steel cable that is not less than 6 mm (flow approximately 250 kg ) so you can rest assured during the operations installation, and to ensure that everything works, we must applied to the cap of the mast a couple of angles on one side and a pair of angular head which will support two pulleys Teflon which will flow into the steel cable ( see drawing ).
And up to now, the structure of the trellis and cart: now here is my personal solution for the installation and the solidity of the whole.
I fixed a ladder to about 10 cm from the tower, which was held at the base and leading the tower with the angular.

This allows me to fit all the trellis without any problem go hand in hand to install the tower.
The lineup is divided into 2 sections and blocked by a couple of bolts in installation finished, and when we have the antennas up in position,
will be attached to the pylon through angular 30x30x3 mm long 25 cm at least 3 equally spaced points between them.

This lineup makes life very easier for operations after installation or for simple maintenance checks.
Not to leave the cable lift in traction, I have adopted a bracket system that operated manually and put into place to lift the case, thanks to the lineup (see detail picture on cart).
Everything described so far is obviously made with iron "dirty", that is untreated, so you need to make the hot-dip galvanizing all.

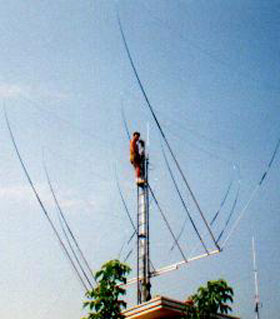
And for those who have had the strength to get up to these lines, we now pass cost: the trick is to find a local blacksmith honest and I had
this good fortune, then, between iron and zinc are up to 150 €.
Yes, I agree with those who say that there's too much work and there to do hard work, but at least I tried and eventually more
satisfied with the results for what has been done with the own hands.
Finally, we judge how about the object?

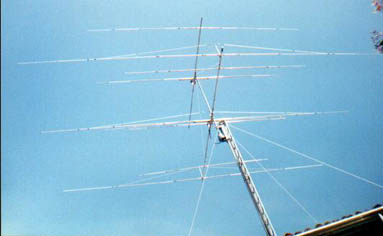
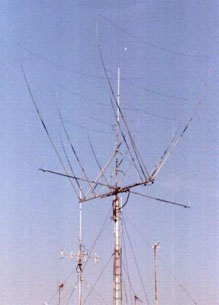
To give an idea of what this lattice supports, have a look at the photos: first was a system monoband bunk, and now there
a delta loop.
Consider also that can stretch to well over 6 mt, course understanding that there insatalla later and with braces adequate.

Over the years we have made some improvements that not result from the photos, but have been described in this article and as regards maintenance, once fattened points critics and put the rods fit, you can also forget about him roof!
So I would say, since I am 25 years which is a function, which stands up well!
I wish good job to who promises to carry on this work, emphasizing the particular that "WHO MADE
HIMSELF ......"
They are, as always, available for clarification.


IK4DCS