by Steve Woodyard
Over the years the Rhodes was produced the pickups changed physically but not significant electrically. Usually the changes were related to improved production, some were related to improved sound.
The major changes were to the bobbin, magnet and mounting bracket. The early pickups had 1-inch long magnets and the bobbin size and shape was related to this length. They also had coils that used the green or red insulated coil wire. They had no protective tape over the coil wire. Later versions had clear or white protective tape.
The early models (73 Key) were also wired in a different series parallel grouping. The first 7 in parallel were then wired in series to 6 in parallel, then 6 more etc. till the last note. (7,6,6,6,6,6,�). They had 1 inch long magnets that would influence the decay properties of the vibrating tines so the magnets were changed to one half inch in length to minimize the decay frequency changes. Near the same time, (early 1970's) and as a result of the magnet change, the pickups wiring was changed to the series parallel grouping of 4,3,3,3, (first, 4 in parallel then parallel groups of three till the last note) This was the configuration for 73 key pianos until the conclusion of production in 1985.
The 88 key pianos also had this grouping but the last notes past 73 were separated through a capacitor into a separated section. In other words the harp was divided starting at the C below the high C (88). The high-end section of an 88 is series parallel grouped as 3,2,2,2,1,1,1,1. Some people comment that the 88's sounded different then the 73's. This is true and it is due to the slightly lower output signal of the 88 harp due to the different wiring.
The pickups normally don't go bad but, when one is not operational, they are easy to replace. Sometimes the pickup sounds low or quiet but in reality the pickup is dead and the adjacent pickups are producing a faint signal. The best way to isolate the bad is to take a small screwdriver and tap (while the piano is on) the rivet portion of the pickups in the area that the suspected dead one is located. Each good pickup will produce a loud clank. The true open one will produce nothing.
The next thing to do is to unsolder the connecting wire. Be careful; too much heat will cause the terminal to melt the nylon bobbin. The connecting wire wraps around the terminal. Heat quickly and gently unwrap. Removing the bracket mounting screw first will help in giving the wire more slack. Inspect the pickup and if possible measure it with an ohmmeter. A good pickup, depending on vintage, will measure somewhere between 170 and 190 ohms. If the pickup measures open inspect the coil wire where it is attached to the terminals. If it is broken at the rear or coil start location, a new pickup has to be obtained. If it is broken at the front or coil end location you can carefully unwrap one turn and rewind the coil wire around the terminal and re-solder. Re-measure the pickup with the ohmmeter. If you get the appropriate reading, then re-install. If not, then replace. When you re-attach the connecting wire use the simplified version of hooking it up, due to the short amount of wire slack. (See top view)
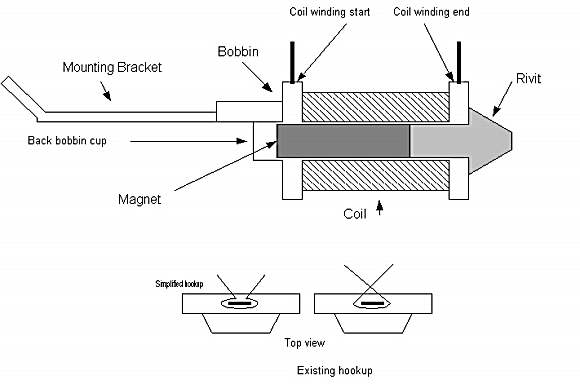
Sometimes a pickups can produce what appears to be a noise or distortion. The magnet being loose inside the bobbin causes this. The magnet is inserted into the bobbin then an adhesive was poured into the bobbin to seal any gaps between the magnet and the bobbin. Sometimes this seal was not successful and allowed the magnets to vibrate along with the note causing a noise or distortion. The best way to find the culprit pickup is to gently tap (while the piano is on) the pickup coil with the eraser end of a pencil and listen to the sound. A noise or "microphonic," kind of sound indicates a loose magnet. The coils are better positioned for this test if the harp is hinged up (vertical). To fix this problem, reverse hinge the harp or place the harp in a vertical position such that the pickup rivets are pointing down (as best as possible) and the back or bobbin cup is up and accessible. Pour a small amount of thin or viscous glue (DUCO cement is perfect and is found in hardware and even grocery stores) into the bobbin cup. Allow the glue to dry and then retest (with the eraser) the pickup. It should sound the same as a good pickup.